


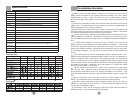
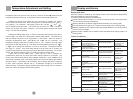

The appliance requires 220V~/50Hz for 628/388/288/386/310 or 220V~/50Hz and
220V~/60Hz for 628/626.A regulator with a capacity of 4000W or higher must be
installed if the voltage if beyond the rated voltag
8/626(115V~/60HZ ),and the extended length must not exceed 3m.
Haier
Haier
e of ±10%.If the power cord needs
to be extended, the extended conductor must have a cross area of equal or greater
than 2mm for 628/388/288/386/310(220V~50/60Hz) or 3mm for
62
~
(220V~50/60Hz)
2 2
Your Haier ULT unit is equipped with a standard three-prong power plug, rated
current for 20A for 628/626(115V 60Hz) and 16A for
628/388/288/386/626/310/420 . Be aware that one of the three
prongs is for grounding purposes. Removal of the ground prong is strictly
prohibited for safety reasons under any circumstances. The electrical power plug
should be securely plugged into the power socket. A loose plug in the socket may
cause fire.
The power socket intended for your Haier ULT usage must be grounded to avoid
electric shock. If the socket does not meet this requirement, the condition must be
corrected by a qualified technician before using the ULT unit.
Never use gas lines, water mains, telephone lines or lightening rods as the
grounding device for your Haier ULT unit. This type of improper grounding may
cause electric shock or other danger.
Never install your ULT in an unprotected area. After a unit is rained on, there is a
danger of electric shock.
Your Haier ULT must be securely installed on a firm floor. A tilted installation may
result in equipment falling causing injury and damage.
Your ULT must not be installed in a damp area or an area that can be subject
to water spray. A damp or wet unit may cause weakening of insulation which could
lead to electric shock.
Never store flammable, explosive or volatile materials in the unit. To avoid potential
explosion or fire, do not use any spray near the unit.
Never store corrosive chemicals with acid or alkaline properties in the unit as they
can lead to damage to internal components of the unit.
Do not use any hard object to explore any openings or gaps such as air ventilation
ports. Accidental contact between the hard object and a moving part may result in
electric shock or injury.
If poisonous, radioactive or other harmful materials need to be stored in the unit,
the equipment should be located in a safe zone. Improper usage of the equipment
with this type of materials may hurt the environment or operator's health.
Installation and maintanence of your Haier ULT should be carried out only after
reading this manual. Equipment & Instrument Services can install and
validate your unit please call local Haier sales and service center
.
4
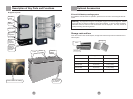
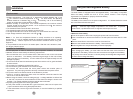
Proper Usage
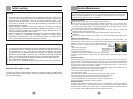
Optional Accessories
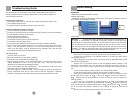
2) Remove the supplementary power supply
Power LED light continues to flash. The recorder works normally. It suggests that the
main power supply is sufficient while the backup battery lacks capacity. It is then
necessary to replace the battery until the green LED lights up and stops flashing.
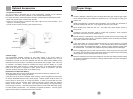
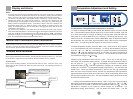
When changing the chart paper for the recorder, please use the following steps.
a. Locate the button at the front of the recorder.
b. Press and hold the button for about one second. The imprinting stylus of the
recorder moves to the left side of the chart.
c. When the stylus is completely off the chart, unscrew the center nut for the paper
and remove the old chart paper off the recorder. Place a new chart paper on the
recorder. Carefully match the day and time line on the chart with the reference mark on
the recorder panel (there is a small groove on the front of the recorder as shown in the
figure).
d. Place the center nut over the chart paper and tighten it. Press the button to
move the stylus back to the chart to continue the temperature recording.
e. Inspect the contact between the pen and the paper chart. Adjust the arm if
necessary to make contact. (Note, do not damage the pen and arm. It might be easier
to remove the arm and pen to make a small bending adjustment and then install the
pen back on the recorder. Repeat the process until the recorder arm and pen work
properly )
f. The accuracy of the temperature must be checked after changing the chart paper.
The procedure is described as follows. Press and hold the button until the pen
moves to the outside of the chart paper. Then press the button again; the pen
should return to the chart paper area. When the pen reaches the outer most circle of
the chart paper, it pauses for a moment. If the pen does not match the outer circle of
the chart marks, you can use the button (#2) or the button to move the pen to
match the line. This must be done within 5 seconds after the pen pauses. If the
calibration is incomplete, repeat the same process until the pen matches the outer
circle line.
4) Calibration of Temperature Recorder
3 Changing of Recorder Chart Paper
(#3)
(#3)
(#3)
(#3)
(#3)
(#1)
)
.
21