18
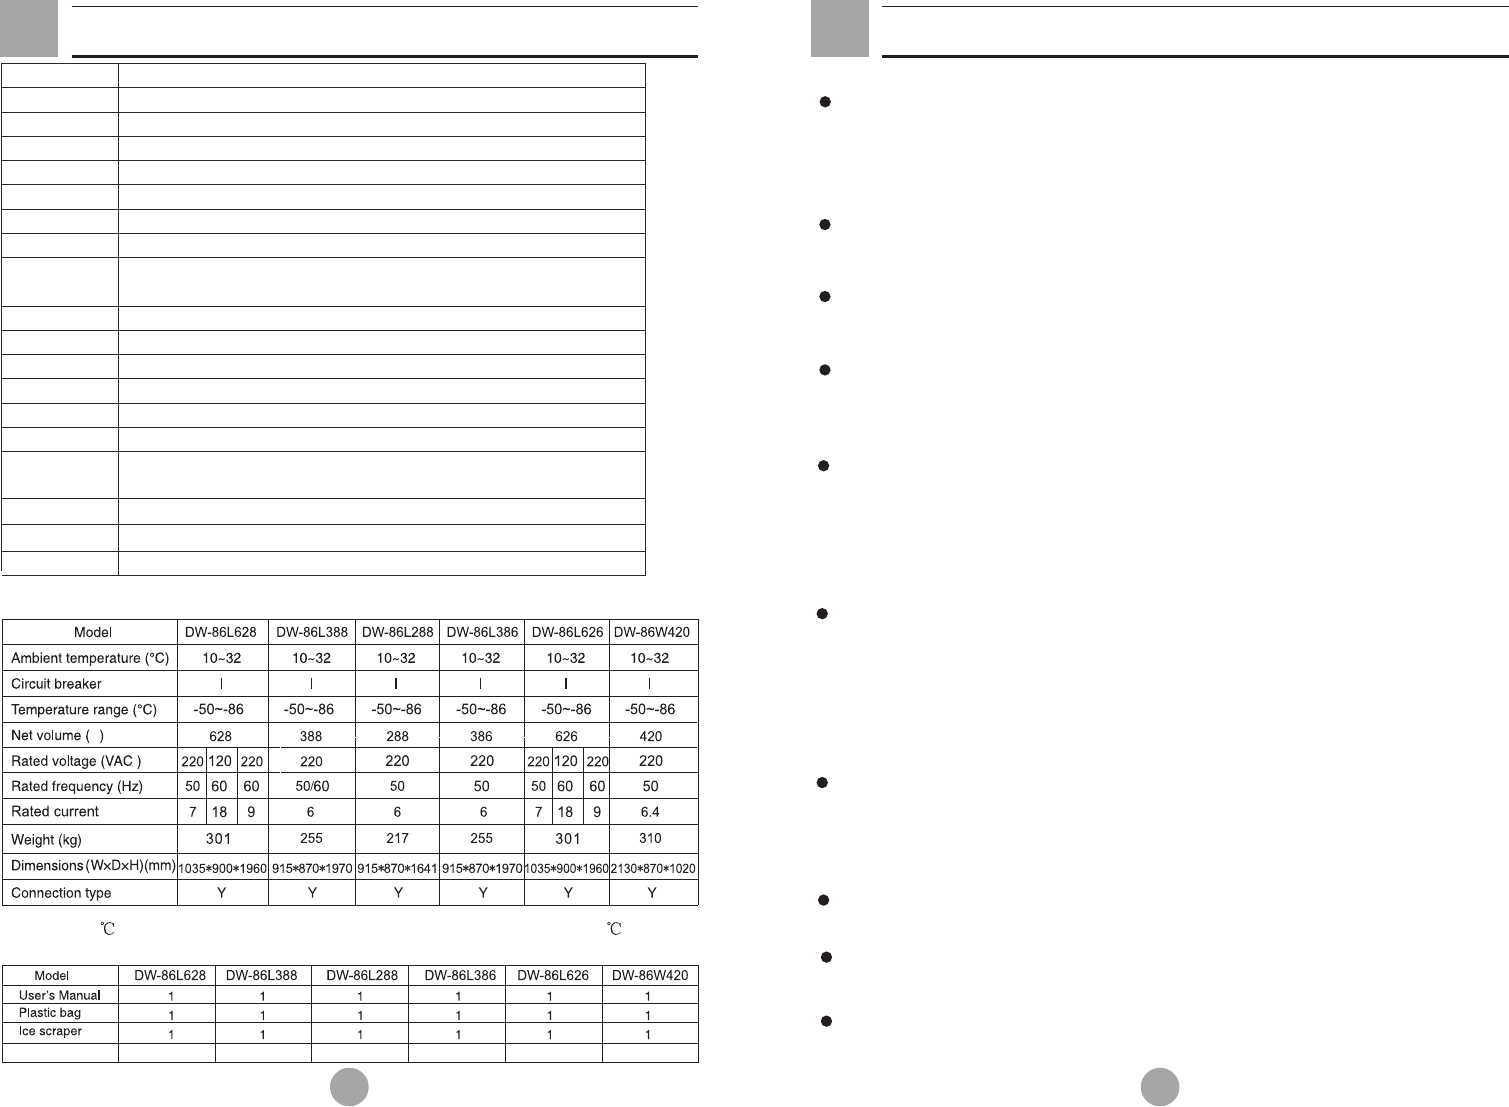
Specifications
Description
Model Description
Exterior wall material
Interior wall material
Inner doors
Shelves
Porthole for testing
Insulation
Compressors
Evaporator
Condenser
Refrigerant
Temperature controller
Temperature display
Temperature sensor
Alarm device
Remote alarm
terminals
Battery
Accessory
Ultra Low Temperature Storage Freezer
DW-86L628/388/288/386/626
Coated cold rolled steel
Coated zine cold rolled steel
Aluminum framed PS board
Adjustable stainless shelves
25.8 mm diameter X 1 Located on back wall
Vacuum insulated with polyurethane foam(non-CFC)
High stage/Low stage: hermetically sealed
Copper tube
High stage: Finned coil Low stage: tube in tube heat exchanger
R134a R404a R290 R23
Microprocessor controller
Digital display
RTD Pt 100 ohms
High temperature alarm, low temperature alarm, power outage alarm, ambient
temperature alarm, dirty condenser alarm, battery alarm, voltage alarm
Maximum load is 24 VDC at 1A
Rechargeable 12 VDC, automatically rechargeable
Defrost scraper
Note: design parameters may vary. No further notice is available.
Technical data
Note:
Packing list
At 25 ambient, the unit's maximum cold temperature can reach -86 .
DW-86W310/420
L
Key / / / 2 2 /
7
When a ULT unit has been placed in storage or out of service for a long time, its
battery should be tested for low capacity because the battery may have already
released all of its energy. It does not mean the unit is in a malfunctioning condition.
Should this condition occur, please run the unit for about 6 days to fully charge up the
battery.
When the unit operates normally, the unit frame at the front near the door may be
slightly warm. This phenomenon is normal because hot tubing is embedded there to
prevent condensation from forming on the frame.
Before samples are loaded into the unit, make sure that the unit temperature has
reached the set point then load the samples into the freezer in batches. This method
can reduce the temperature rise as the load is being introduced.
The temperature display indicates the temperature where the temperature sensor is
mounted inside the unit chamber. Temperature uniformity within the chamber may vary
from the sensor location due to loading patterns or insufficient temperature stabilization
time.
An access port is installed in the back wall of the unit which can be used as the
through hole for the thermocouple wires during testing and validation . After all test
wires are let through the access port, make sure that the gap in the port is sealed
properly with insulation materials. Otherwise, the unit temperature may not come down
to the desired temperature. The port ring in the outer wall can also accumulate frost
and ice.
When cleaning the unit, mild or neutral detergent solution should be used. (Non-
diluted cleaning chemicals can damage the plastic portion of the unit. For directions on
making a cleaning solution, please refer to the detergent section in the instructions).
Never use a hard wire brush, acid, gasoline, detergent powder, polishing powder, or hot
water to clean the freezer as these tools and materials can damage the powder coating
and surface of the plastic. Particularly, never use gasoline or a solution with volatile
chemicals to clean plastic or rubber parts.
After the freezer runs for some time, a layer of frost usually forms on the interior
liner and inner doors. When this layer of frost gets too thick, it can negatively impact
the refrigeration performance of the unit. Energy consumption can increase. If the
thickness reaches about 5 millimeters, please use the provided scraper to remove the
frost.
Before removing the frost, temporarily transfer the stored samples to another
freezer. This reduces the chance of property loss due to rising temperatures.
Behind the interior walls, there are many refrigeration tubes. Do not use a knife, an
ice pick, or a screwdriver to cut ice and frost. This can potentially damage not only the
liner but also the refrigeration tubes.
If the freezer is not in use for a long time, please turn off the power and switch off
the backup battery. The power cord should be unplugged.
Pre-Installation Information


