


7
6
• Because of the irregular surface of English muffins, they may
require more than one toasting cycle. After toasting for one
cycle on setting 6, if a darker shade is desired, adjust shade
selector to setting 2 or 3 and toast for a second cycle. Watch
closely to avoid overbrowning. English muffins cut with a knife
toast more evenly than English muffins split with a fork.
• Many toasters have thermostats that must reset after toasting
one cycle. The electronic controls of this toaster allow toasting
batch after batch, with no waiting for the thermostat to reset.
• Thick foods may become wedged in the toaster slot. If food
becomes jammed, the toaster will automatically shut off at the
end of the toasting cycle. Unplug the toaster and let cool. Use
a wooden utensil to remove food.
• When toasting only one slice, the bread may be placed in
any slot of the toaster. When toasting a single slice, you may
notice variations in bread color from side to side.
• Setting 6 is the darkest shade of toast color. If a darker shade
is desired, reset at setting 3, watch closely and toast for a sec-
ond cycle.
• The bread lifter will not latch down unless the toaster is
plugged in.
®
Pop Tart is a registered trademark of the Kellogg Co.
* NOTE: Hamilton Beach/Proctor-Silex does not recommend
heating toaster pastries in your toaster. Toaster pastries
should be heated in a toaster oven broiler. However, if an
alternative is not available, and you must use the toaster, be
sure to set the toaster to the lowest possible setting, and
never leave the toaster unattended during use.
** Available on select models.
Toasting Guide
FOOD
Regular bread
3 to 5 Toast
English muffins 6 Bagel
Bagels 3 to 6 Bagel
Frozen bread or buns 4 to 5 Toast
Frozen waffles 2 to 3 Toast
Toaster pastries (such as Pop Tarts
®
)* 1 Toast
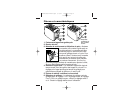
Cleaning
NOTE: If the toaster is used daily,
the crumb tray should be cleaned
weekly.
1. Unplug toaster and let cool.
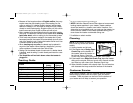
2. If the toaster has a Swing-Open
Crumb Tray on the bottom of
the toaster, place the toaster on
its side, as shown. Open the
Crumb Tray and wipe off with clean cloth, then close.
3. If the toaster has a Slide-Out Crumb Tray, leave the toaster
sitting on the counter. Slide out crumb tray, discard crumbs
and wipe tray with clean cloth. Replace crumb tray.
4. Wipe outside of toaster with a damp cloth. Do not use abra-
sive cleansers that may scratch the surface of the toaster.
Crumb Tray
Customer Service
If you have a question, call our customer service number.
Before calling, please note the model, type, and series
numbers. These numbers can be found on the bottom of
your toaster and will help us answer your question.
Optional
Setting**
Shade
Setting
840083000 ENv02.qxd 3/6/01 1:28 PM Page 6