


7
6
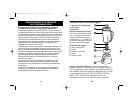
How to Assemble and Use
IMPORTANT: Your blender jar and cutting blades are subject
to wear during normal use. Always inspect jar for nicks, chips
or cracks. Always inspect cutting blades for broken, cracked
or loose blades. If jar or cutting blades are damaged, do
not use. Contact an authorized service facility to obtain
replacement parts.
1. Make sure blender is unplugged. Place blender base on
clean, dry surface to keep foreign particles from being
pulled up into motor during operation.
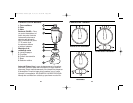
2. Place blades in retaining ring. Fit gasket over blades. The
gasket must lie flat. Set jar on top of gasket and screw on
jar collar.
3. Make sure the jar collar is firmly screwed onto the jar.
If not, it may loosen later when motor is turned on.
4. Set jar into place on blender base, making sure it is
securely seated. If not, gently rock the jar until seated.
5. Put ingredients in jar, place lid on jar.
6. Plug cord into outlet.
7. Process food or beverages. Place hand on lid when
blending liquids. Rotate dial on control panel to start
blender. For 10 or more speeds, rotate dial to desired
speed then slide switch to LO or HI. For models with
fewer speeds, select LO or HI, then rotate dial to
desired speed.
8. ALWAYS turn blender off and wait until blades have
stopped rotating before removing jar.
9. To remove jar after blending is complete, lift the jar
straight up. If it is not easily removed, rock gently and lift.
Do not twist.
10. NEVER replace jar onto unit while motor is running.
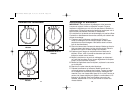
How to Clean the Blender
1. Unplug blender from electrical outlet.
2. Wipe blender base, control panel, and cord with a damp
cloth or sponge. To remove stubborn spots, use a mild,
non-abrasive cleanser.
3. To clean jar, unscrew jar collar and remove cutting unit
assembly from jar.
4. Carefully remove blades and gasket from bottom of
jar collar.
5. Carefully wash blades, jar collar, gasket, jar (if plastic), and
lid in hot, soapy water. Rinse and dry thoroughly. Do not
soak. Do not wash blades, jar collar, gasket, plastic jar,
or cover in a dishwasher.
6. Reassemble cutting unit assembly onto jar, replace jar
onto blender base.
7. Store blender with lid ajar to prevent container odor.
840111200 ENv00.qxd 2/17/03 2:00 PM Page 6