


SKU 99598/99599 For technical questions, please call 1-800-444-3353. Page 8
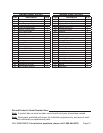
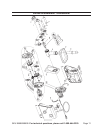
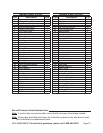
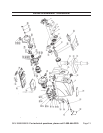
Note: For additional information regarding
the parts listed in the following pages,
refer to the 99599 Assembly Diagram
on pages 12 and 13 of this manual.
Slide Head (12) into Housing Open-1.
ing (15). While holding Head, place
Locking Knob (16) into slot on Left
side of Motor Housing (17).
Turn Locking Knob clockwise until 2.
tight and Head fastened securing to
housing.
Twist Feed Screw (100) into Head. 3.
Continue twisting until Feed Screw
Base (101) is fastened securely into
housing.
Slide Cutting Blade (11) onto Feed 4.
Screw, making sure the edges of Cut-
ting Blade face front of housing.
WARNING!5. Cutting Blade has sharp
blades. Wear gloves and use care
when installing Cutting Blade.
Slide selected Cutting Plate (6, 7, or 6.
8) over Cutting Blade, using the slot
along Plate edge as guide.
Screw Cap (1) into place on hous-7.
ing until secure. CAUTION! Do not
overtighten.
Slide Hopper Plate (13) onto top of 8.
Head until secure.
Set Grinder on at and stable counter 9.
space that does not block vents along
bottom of housing.
Cut foods into small pieces that can 10.
easily t into Hopper.
OPERATION
(FOR 99598 MEAT GRINDER)
Read the ENTIRE IMPORTANT
SAFEGUARDS section at
the beginning of this manual
including all text under
subheadings therein before set
up or use of this product.
Once food is ready, remove the 1.
Power Cord (19) from the Cord Com-
partment (20) and plug Cord into
outlet. The red Power light will turn
on. Press On Key (35) to activate.
Feed food into Hopper Plate. Use 2.
Food Pusher (14) to press food down
Plate and into Head.
WARNING! Do NOT use ngers to 3.
push food into Grinder. Only use
Food Pusher.
Please note: While On Key is 4.
pressed, a beeping will sound and
the green ON light will activate.
To stop the Grinder, press the Off Key 5.
(33).
In case of a food blockage, press Off 6.
key and then Reverse Key (31). The
green reverse light will activate.
Please note: 7. To change from reverse
to forward direction, rst press Off for
at least three seconds before press-
ing On again. This will help prevent
damage to motor.
CAUTION! 8. Machine should not be
run for longer than 20 continuous
minutes. The motor will deactivate
automatically after 1 hour of continu-
ous running.