


6
2
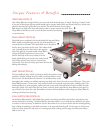
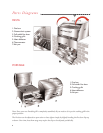
Assembly Instructions
Suburban/Continental/Legacy/Gourmet
Your new Hasty-Bake oven should arrive almost fully assembled. However, a few items are left unassembled
for ease of shipping or loading into vehicles. The unit is not difficult to assemble and there are only two tools
needed for assembly: a Phillips screwdriver and a crescent wrench. If you have any problems assembling your
Hasty-Bake, please call 1-800-4AN-OVEN.
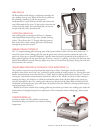
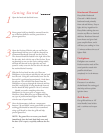
CRANK HANDLE
Screw the crank handle into threaded hole on the left side of
the oven (the side of
the oven opposite the full-width fire door) and continue to turn until the lift
mechanism is moving up and down.
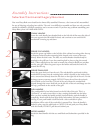
GREASE CUP HOLDER
Attach the grease cup holder to the left side of the cabinet base using either the top
or bottom rotisserie bracket mounting holes located at the center of the oven,
directly below the draft vents. The bolt, nut and lockwasher should already be
attached to the grill base. Leave the remaining bolt in place to plug the unused
hole. (These same bolts are also used to mount the rotisserie should you purchase
one for your grill.) Place the grease cup on the holder and bend the arms to fit
around the foil cup.
GREASE DRAIN ROD
Insert the grease drain rod into the unit. The rod should be positioned with the
notched hole inserted into the retaining hole, which is located on the inside of the
oven, centered and directly above the fire door on the right side of the unit. For the
drainage system to operate properly, DO NOT insert the rod into the rotisserie
spit rod hole on the oven base. The end of the rod without the notched hole
extends through the center draft hole on the left side of the unit and hangs over the
foil cup, positioned on the outside of the grill.
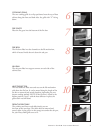
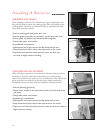
PUSH HANDLE
The push handle fits into holes located on the left side of the unit. This is a
“friction fit”, so work on one side at a time, rotating the handle into the holes.
After you have worked the handle partially into both holes, push the handle in
completely. Attach with the four larger bolts, lockwashers, and nuts provided in
the bag. If your push handle is delivered with a side work table in place,
installation will be easier if the work table is removed first. Once the handle is
bolted in place, snap the table back on. NOTE: Lift and push your Hasty-Bake
with this handle, DO NOT pull the unit behind you.
HOOD HANDLE
Attach the hood handle with the two small bolts and lockwashers provided in the
bag.
1
3
4
5