


— 7 —
Fig. 1
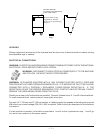
LEVELING
Place a carpenter's level on top of the fryer and level the fryer front-to-back and side-to-side by turning
the adjustable legs or casters.
ELECTRICAL CONNECTIONS
WARNING: ELECTRICAL AND GROUNDING CONNECTIONS MUST COMPLY WITH THE NATIONAL
ELECTRICAL CODE AND/OR OTHER LOCAL CODES.
WARNING: DISCONNECT THE ELECTRICAL POWER SUPPLY TO THE MACHINE
AND FOLLOW LOCKOUT/TAGOUT PROCEDURES.
WARNING: APPLIANCES EQUIPPED WITH A 120V FLEXIBLE ELECTRIC SUPPLY CORD ARE
PROVIDED WITH A THREE-PRONG GROUNDING PLUG. IT IS IMPERATIVE THAT THIS PLUG BE
CONNECTED INTO A PROPERLY GROUNDED THREE-PRONG RECEPTACLE. IF THE
RECEPTACLE IS NOT THE PROPER GROUNDING TYPE, CONTACT AN ELECTRICIAN. DO NOT
REMOVE THE GROUNDING PRONG FROM THIS PLUG.
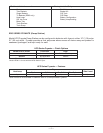
Place fryer as near to its final position as possible. Connect 3 phase line to X, Y and Z of terminal block.
To reach terminal block, remove electric cover plate from fryer.
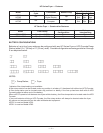
For each 15
1
/2" (39 cm) and 21" (53 cm) section, a 3 phase supply line capable of handling the required
KW at the fryer's rated voltage (208, 240, 480) is needed. Refer to the fryer data plate for this electrical
information.
If a fan interlock is needed, it should be connected to 1 and 2 on the 4 pole barrier strip. 1 and 2 go
to a set of dry contacts on the power switch.
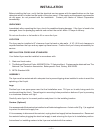
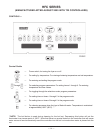
STRAIN RELIEF
FITTING FOR ELECTRIC
THIS SIDE ONLY.
(Strain relief fitting
supplied by Hobart.
Chain to be supplied by
others.)
PL-53296