


— 8 —
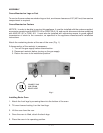
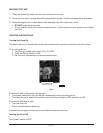
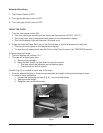
Installing Stacked Ovens
After basic oven is installed:
• Lift the top oven and place it on top of the bottom oven.
• No fasteners are required; the weight of the oven will keep it in place.
LEVELING
Casters for this oven are of the non-adjustable type. For best results, oven should be installed on a
level floor.
GAS CONNECTIONS
Gas supply connections and any pipe joint compound must be resistant to the action of propane gases.
Location of the
3
⁄4" gas inlet is at the back of the oven on the lower right side.
Codes require that a gas shutoff valve (available from Hobart) must be installed in the gas line ahead
of the oven.
Connect gas supply. Make sure the pipes are clean and free of obstructions.
The ovens are equipped with fixed burner orifices which coincide with installation elevation.
Natural gas and propane gas are preset at the factory for proper operation. Store line pressures are
preset for 7" W.C. (Water Column) (1.75 kPa) for natural gas and 11" W.C. (2.75 kPa) for propane gas.
WARNING: PRIOR TO LIGHTING, CHECK ALL JOINTS IN THE GAS SUPPLY LINE FOR LEAKS.
USE SOAP AND WATER SOLUTION. DO NOT USE AN OPEN FLAME.
After piping has been checked for leaks, all piping receiving gas should be fully purged to remove air.
TESTING THE GAS SUPPLY SYSTEM
• When gas supply pressure exceeds
1
/2 psig (3.45 kPa), the oven and its individual shutoff valve
must be disconnected from the gas supply piping system.
• When gas supply pressure is
1
/2 psig (3.45 kPa) or less, the oven should be isolated from the gas
supply system by closing its individual manual shutoff valve.