


– 6 –
Assembling the Legs to the Oven
The legs must be installed on the bottom of the oven. Gently
position the oven on its side, taking care not to scratch or
damage it.
Attach each of the four leg assemblies to the bottom of the
oven with the 24 bolts and lockwashers (six per leg). Carefully
raise the oven to its normal position.
ASSEMBLING THE STAND TO THE OVEN
Attach each of the four leg assemblies to the bottom of the
oven with the 24 bolts and lockwashers (six per leg). Carefully
raise the oven to its normal position.
Attach the undershelf to the legs with eight bolts and
lockwashers (two per leg).
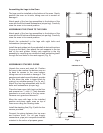
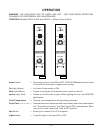
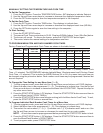
Install the rack guides into the undershelf at desired locations
(for pan or flat rack), then attach the rack supports to the top
end of the rack guides. Attach rack supports to the leg
assembly by removing one middle bolt and reattaching back
through the end holes in the rack support (Fig. 2).
ASSEMBLING STACKED OVENS
Unpack the ovens and stack kit. Position
the oven to be used as the bottom oven on
its back for access to the oven bottom,
taking care not to scratch or damage it. The
gas pipe protrudes beyond the back; provide
for this when the oven is tipped back by
resting it on suitable spacers (2 x 4's, etc.).
Attach the four leg assemblies with the 24
bolts and lockwashers (six per leg).
Place the lower oven (with legs) on the floor
and remove two
7
/16 inch (1.1 cm) diameter
knockouts on each side of the top cover.
Remove vent guard and discard it.
Move the oven with legs to the installed
position and place upper oven on top of
lower oven using the locating studs.
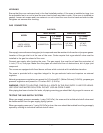
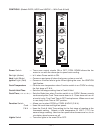
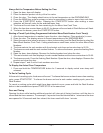
Install the stacking flue (Fig. 3) with the four
screws provided.
Connect the piping between the top oven
and bottom oven. For all gas supply
connections, pipe joint compound must be
resistant to the action of propane gases.
Fig. 2
STACKING FLUE
PL-53564
BACK
FRONT
RACK SUPPORT
RACK GUIDE
PL-56178
Fig. 3