SPYDER® LON PROGRAMMABLE, VAV/UNITARY CONTROLLERS
5 62-0287—03
Panel Mounting
The controller enclosure is constructed of a plastic base plate
and a plastic factory-snap-on cover.
NOTE: The controller is designed so that the cover does not
need to be removed from the base plate for either
mounting or wiring.
The controller mounts using four screws inserted through the
corners of the base plate. Fasten securely with four No. 6 or
No. 8 machine or sheet metal screws.
The controller can be mounted in any orientation. Ventilation
openings are designed into the cover to allow proper heat
dissipation, regardless of the mounting orientation.
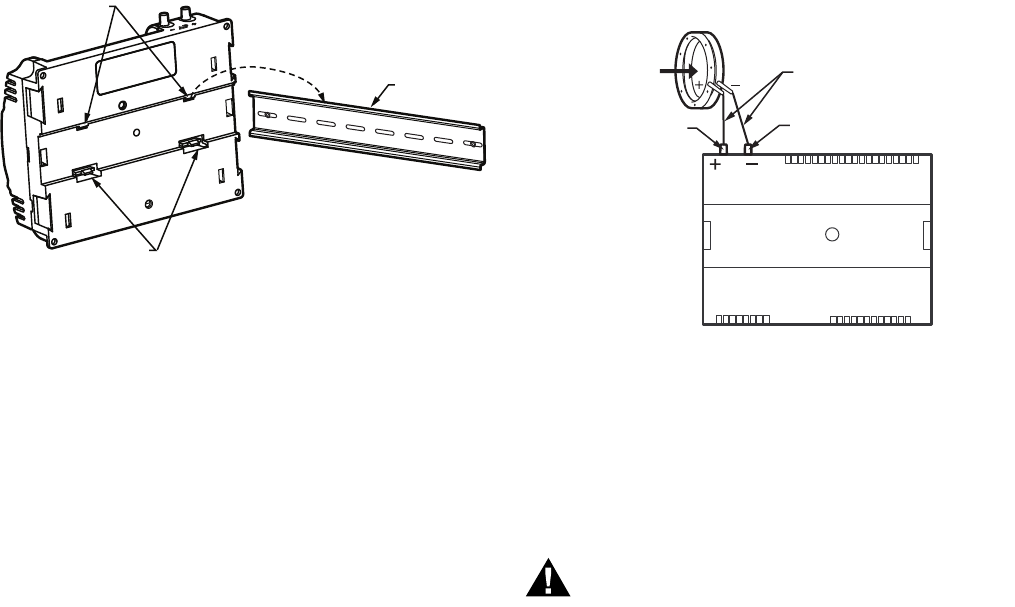
DIN Rail Mounting (PUL1012S, PUL4024S,
PUL6438S, PVL4024NS, and PVL6438NS)
To mount the PUL1012S, PUL4024S, PUL6438S,
PVL4024NS, or PVL6438NS controller on a DIN rail [standard
EN50022; 1-3/8 in. x 9/32 in. (7.5 mm x 35 mm)], refer to
Fig. 8 and perform the following steps:
1. Holding the controller with its top tilted in towards the
DIN rail, hook the two top tabs on the back of the con-
troller onto the top of the DIN rail.
2. Push down and in to snap the two bottom flex connec-
tors of the controller onto the DIN rail.
Fig. 8. Controller DIN rail mounting (models PUL1012S,
PUL4024S, PUL6438S, PVL4024NS, and PVL6438NS).
IMPORTANT
To remove the controller from the DIN rail, perform the
following:
1. Push straight up from the bottom to release the top
tabs.
2. Rotate the top of the controller out towards you and
pull the controller down and away from the DIN rail to
release the bottom flex connectors.
Piping (PVL0000AS, PVL4022AS,
PVL4024NS, PVL6436AS, and PVL6438NS)
Air flow Pickup
For PVL0000AS, PVL4022AS, PVL4024NS, PVL6436AS, and
PVL6438NS, connect the air flow pickup to the two restrictor
ports on the controller (see Fig. 9).
NOTES:
— Use 1/4 inch (6 mm) outside diameter, with a
0.040 in. (1 mm) wall thickness, plenum-rated
1219 FR (94V-2) tubing.
— Always use a fresh cut on the end of the tubing
that connects to the air flow pickups and the
restrictor ports on the controller.
Connect the high pressure or upstream tube to the plastic
restrictor port labeled (
+), and the low pressure or
downstream tube to the restrictor port labeled (
-). See labeling
in Fig. 9. When twin tubing is used from the pickup, split the
pickup tubing a short length to accommodate the connections.
NOTES:
— If controllers are mounted in unusually dusty or
dirty environments, an inline, 5-micron disposable
air filter (use 5-micron filters compatible with
pneumatic controls) is recommended for the high
pressure line (marked as
+) connected to the air
flow pickup.
— The tubing from the air flow pickup to the control-
ler should not exceed three feet (0.914 m). Any
length greater than this will degrade the flow
sensing accuracy.
— Use caution when removing tubing from a con-
nector. Always pull straight away from the con-
nector or use diagonal cutters to cut the edge of
the tubing attached to the connector. Never
remove by pulling at an angle.
Fig. 9. Air flow pickup connections (PVL0000AS,
PVL4022AS, PVL4024NS, PVL6436AS, and PVL6438NS).
Wiring
All wiring must comply with applicable electrical codes and
ordinances, or as specified on installation wiring diagrams.
Controller wiring is terminated to the screw terminal blocks
located on the top and the bottom of the device.
Electrical Shock Hazard.
Can cause severe injury, death or property
damage.
Disconnect power supply before beginning wiring or
making wiring connections, to prevent electrical shock
or equipment damage.
DIN RAIL
TOP TABS
BOTTOM FLEX
CONNECTORS
M16815
M23556A
AIR FLOW
PICKUP
ΔP
1
2
3 4 5 6
7 8
1 0 9 2 3 4 5 6 7 8 0 9
1 1 1 1 1 1 1 1 1 2 1
1
2
3 4
5
6
7 8
0
9
2
2 2
2 2
2
2
2 2
3
3
1
2
3 4
5
6
7 8
0
9
3
3
3
3 3
3 3
3 4
RESTRICTOR
PORT
RESTRICTOR
PORT
CONNECTOR
TUBING


