


Installing a domestic appliance can be a complicated operation which if not carried out correctly, can seriously affect consumer
safety. It is for this reason that the task should be undertaken by a professionally qualified person who will carry it out in
accordance with the technical regulations in force. In the event that this advice is ignored and the installation is carried out
by an unqualified person, the manufacturer declines all responsibility for any technical failure of the product whether or not
it results in damage to goods or injury to individuals.
2 GB
BUILT-IN
The furniture in which your hob will be installed and all adjacent
furniture, should be made from materials that can withstand high
temperatures. In addition, all decorative laminates should be fixed
with heat-resistant glue.
Installation:
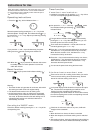
• A watertight seal is supplied with the hob.
Before fitting:
- turn the hob upside down, with the glass surface facing downwards.
Make sure the glass is protected.
- fit the seal round the hob.
- make sure that it is correctly fitted to avoid any leakage into the
supporting cabinet.
• It it important to fit the hob on a level supporting surface.
• Deformations caused by incorrect fitting can alter the specifications
of the worktop and the performance of the hob.
• Leave a gap of at least 5 cm between the appliance and any
neighbouring vertical surfaces.
• It is absolutely essential that the recess conforms with the
dimensions indicated.
•You can not build the hob in above an oven with no fan, a
dishwasher, fridge, freezer or washing machine.
INSTALLATION
• The yellow/green wire of the power supply cable must be
connected to the earth of both power supply and appliance
terminals.
• The manufacturer cannot be held responsible for any accidents
resulting from the use of an appliance which is not connected
to earth, or with a faulty earth connection continuity.
• Any queries regarding the power supply cord should be referred
to After Sales Service or a qualified technician.
"The installation must conform to the standard directives."
The manufacturer declines all responsibility for any damage that
may be caused by unsuitable or unreasonable use.
Warning :
• Always check before any electrical operation, the supply tension
shown on the electricity meter, the adjustment of the circuit-
breaker, the continuity of the connection to earth to the installation
and that the fuse is suitable.
• The electrical connection to the installation should be made via
a socket with a plug with earth, or via an omnipole cut-out switch
with an opening gap of at least 3 mm.
If the appliance has a socket outlet, it must be installed so that
the socket outlet is accessible.
ELECTRICAL CONNECTION
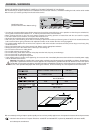
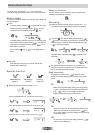
• Cut a hole in the worktop of the dimension shown in the
diagram below.A minimum of 50 mm space should be left
around the hole.
• The worktop should be at least 30 mm thick and made of
heat-resistant material.As shown in the Figure(1)
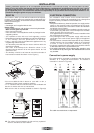
• It is essential that the induction hob is well ventilated and
that the air intake and exit are not blocked.
Make sure the hob is correctly installed as shown in Figure(2)
JIKID HJ
JIKID JJ
JIKIB HJ
A`i `ekXb\
A`i \o`k
NB: For safety, the gap between the hob and any cupboard
above it should be at least 760mm.
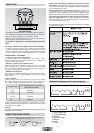
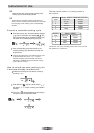
Connection to power supply
The socket shall be connected in compliance with the relevant
standard, to a single-pole circuit breaker. The method of
connection is shown in Figure(3):
Seal
The cable must not be bent or compressed.
be carried out the by sale agent with dedicated tools to avoid
any accident.
• I f the cable is damaged or to be replaced, the operation must
Grey
L1 L2
N1 N2