


25
At the end of the last 3 hours (at the end
of countdown) the 3h LED will stop
blinking and remain on to indicate the
washing phase and the program will start
automatically.
If countdown has not ended, whereby
the program has not yet started, it is
possible to change or cancel the delayed
start and select another program or to
select/unselect the option button, proceeding
as follows:
■ Hold down the selected program button
for at least 5 seconds (the corresponding
LED will start to blink while the set time
LED will stop blinking and remain on).
■ Press the "DELAY START" button to
set another delayed start time (the
corresponding time LED will turn on) or
cancel delayed start (corresponding time
LEDs will all turn off).
■ A new program can be set after a
delayed time has been changed or
cancelled (the corresponding LED will
stop blinking and remain on) or an option
button has selected or deselected.
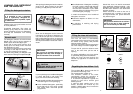
Fault signals
If malfunctions or faults occur when a
program is running the LED that
corresponds to the selected cycle (2 LEDs
for the "COLD RINSE" program) will blink
rapidly.
In this case, turn the dishwasher off by
pressing the "ON/OFF" button. After
checking to make sure the water intel hose
tap is open, that the drain hose is not bent
and that the siphon or filters are not
clogged, set the selected program again. If
the anomaly persists, contact Customer
Service.
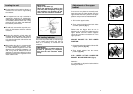
IMPORTANT
This dishwasher is equipped with an
anti-overflow safety device which will
automatically empty any excess
water should a problem occur.
WARNING!
To ensure the correct operation of
the anti-overflow safety device, it is
recommended not to move or to tilt
the dishwasher during operation.
If it is necessary to move or to tilt the
dishwasher, first make sure the
washing cycle is finished and that no
water is left in the tank.
24
Changing a running program
Proceed as follows to change or cancel a
running program:
■ Hold down the current program button
(with the LED on) for at least 3 seconds.
The program LEDs (except for the
"RAPID" program LED) will blink until all
water is drained (if necessary).
The running program will be cancelled
and the corresponding LED will start to
blink.
IMPORTANT
To cancel the "COLD RINSE" program,
simultaneously hold down the
"RAPID" program button and "HALF
LOAD" option button (the relevant
LEDs will blink to confirm cancellation).
■ At this point a new program can be set.
WARNING!
Before starting a new programme,
you should check that there is still
detergent in the dispenser.
If necessary, top up the dispenser.
If there is any break in the power supply
while the dishwasher is operating, a
special memory stores the selected
programme and, when the power is
restored, it continues where it left off (if
it is necessary, the appliance will make
a short thermal anti-shock programme
before).
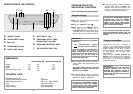
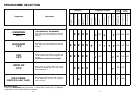
Program operations
When a program is running the relevant
LED will remain on and the 3 “PROGRAM
STATUS” LEDs ("WASH", "RINSE", and
"DRY") will light singularly and in
sequence to indicate the current phase.
Program end
The “PROGRAM STATUS” LEDs will turn
off and the selected program LED (2 LEDs
for the "COLD RINSE" program) will blink
to indicate that the cycle has ended.
Dishes can now be removed and the
dishwasher turned off by pressing the
"ON/OFF" button or dishes can be loaded
for new cycle.
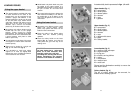
Option button
"HALF LOAD" button
By using this option, it is possible to wash
a smaller quantity of crockery: you should
load only the upper basket for dishes and
place cutlery in the tray in the bottom
basket.
This reduces water and energy consump-
tion and requires a smaller quantity of
detergent.
IMPORTANT
This button MUST be set BEFORE the
program starts.
"DELAY START" button
Dishwasher start time can be set with this
button, delaying the start by 3, 6 or 9 hours.
Proceed as follows to set a delayed start:
■ Press the "DELAY START" button (each
time the button is pressed the start
will be delayed by 3, 6 or 9 hours
respectively and the corresponding time
LED will light).
■ To start countdown, press the selected
program button (the relevant LED will
stop blinking and remain on, while the
set time LED will start to blink).
If a 9 hour delay is set, countdown will be
displayed by the 6h LED after 3 hours and
the 3h LED after 6 hours.