


55
14) Replace all parts in their correct positions.
IMPORTANT
When installing the baffles, make sure that the bent surface (the one without the
studs) faces the actuator so that the bent surface can guide the ice to the center
of the actuator.
15) Move the flush switch to the “ICE” position, then turn on the power supply. Replace the
top panel and front panel in their correct positions. Make ice using the solution until the
icemaker stops making ice.
[e] Sanitizing Procedure - Final
1) Remove the front panel and top panel, then turn off the power supply.
2) Move the flush switch to the “FLUSH” position.
3) Turn on the power supply and drain out all water from the water line.
4) Turn off the power supply.
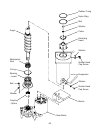
5) Remove the strap connecting the spout to the chute assembly.
6) Remove the thumbscrews securing the spout and lift it off.
7) Pour the sanitizing solution over the extruding head until the evaporator assembly and
the reservoir are filled and the solution starts to overflow into the drain pan.
8) Replace the spout and strap in their correct positions.
9) Allow the icemaker to sit for about 10 minutes before operation.
10) Move the flush switch to the “ICE” position, then turn on the power supply. Replace the
top panel and front panel in their correct positions. Make ice using the solution until the
icemaker stops making ice.
11) Remove the front panel.
12) Move the flush switch to the “FLUSH” position to drain the remainder of the solution.
13) After the solution is drained, move the flush switch to the “ICE” position.
14) Replace the front panel in its correct position.
15) Open the water supply line shut-off valve and supply water to the reservoir.