


53
G. Removal and Replacement of Door Gasket
Remove old gasket by pulling it directly out of the vinyl gasket retainer. Thoroughly clean
the gasket area with mild soap and water prior to installing the new gasket. The new
gasket should be installed by assembling it at the corners rst, then working toward the
center at the top, bottom and sides. The arrow-shaped portion of the gasket should be
rmly seated in the retainer groove for proper assembly. This can be checked by lifting
the edge of the gasket and observing the engagement.
CAUTION
In order to get a proper gasket t, it is important not to stretch gasket material
during assembly.
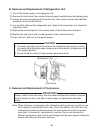
H. Removal and Replacement of Defrost Heater
1) Turn off the power supply, and unplug the unit.
) Remove the front panel, then remove the wire guard located below the display panel.
3) Unhook the wiring connectors at the control box, then remove the two hex-head M6
attachment nuts and the M5 bolt.
4) Very carefully slide out the refrigeration system. Support the evaporator as it clears the
evaporator case.
5) Remove the connection lead wire for the defrost heater.
6) Remove the two 4×8 T evaporator shroud screws above each end of the defrost
heater.
7) Carefully remove the defrost heater by twisting the ends together and removing the
ends from the slots in the shroud.
8) Return the refrigeration unit to its proper position in the reverse order of the removal
procedure.
9) Plug in the unit, and turn on the power supply.
CAUTION
Be careful when handling both the old and new defrost heaters. The heaters
are sheathed in glass tubes and can possibly cause cuts if broken. Heater will
also be hot after a defrost. Use gloves when handling. Avoid touching the glass
directly; hold the heaters by the ends.