


51
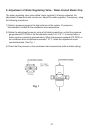
3. Removal and Replacement of Compressor
IMPORTANT
Always install a new drier every time the sealed refrigeration system is opened. Do not
replace the drier until after all other repair or replacement has been made.
Note: When replacing a compressor with a defective winding, be sure to install the new start
capacitor and start relay supplied with the replacement compressor. Due to the ability of
the POE oil in the compressor to absorb moisture quickly, the compressor must not be
opened more than 15 minutes for replacement or service. Do not mix lubricants of
different compressors even if both are charged with R-404A, except when they use the
same lubricant.
1) Turn off the power supply.
2) Remove the panels.
3) Recover the refrigerant and store it in an approved container.
4) Remove the terminal cover on the compressor, and disconnect the compressor wiring.
5) Remove the discharge and suction pipes using brazing equipment.
6) Remove the hold-down bolts, washers and rubber grommets.
7) Slide and remove the compressor. Unpack the new compressor package. Install the new
compressor.
8) Attach the rubber grommets of the prior compressor.
9) Sandpaper the suction, discharge and process pipes.
10) Place the compressor in position, and secure it using the bolts and washers.
11) Remove plugs from the suction, discharge and process pipes.
12) Braze the process, suction and discharge lines (Do not change this order), while purging with
nitrogen gas flowing at a pressure of 3-4 PSIG.
13) Install the new filter drier.
14) Check for leaks using nitrogen gas (140 PSIG) and soap bubbles.
15) Evacuate the system, and charge it with refrigerant. For air-cooled and water-cooled models,
see the nameplate for the required refrigerant charge. For remote air-cooled models, see the
charge label in the machine compartment.