


12
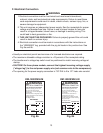
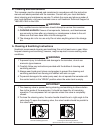
7) Remove the tie securing the upper unit's bin control thermostat assembly.
8) Remove the bin control thermostat assembly from the shipping hook by lifting it up and
shifting it to the right.
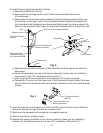
9) Remove the thermostat bulb attachment (plastic) of the upper unit from the thermostat
extension bracket (stainless).
10) Carefully remove the thermostat bulb from the thermostat bulb attachment (plastic) of
the upper unit.
11) Carefully route the thermostat bulb and capillary tubing of the upper unit through the
bottom hole of the upper unit. Remove the bushing from the lower bin control thermostat
assembly. Route the bulb and tubing through the hole in the assembly and down into
the bin. Reattach the bushing.
12) Secure the lower bin control thermostat assembly in place with the thumbscrews.
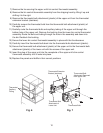
13) Carefully insert the thermostat bulb back into the thermostat bulb attachment (plastic).
14) Secure the thermostat bulb attachment (plastic) of the upper unit to the thermostat bulb
attachment (plastic) of the lower unit with the screws of the upper unit.
15) Insert the plug of the upper unit into the receptacle of the upper unit's bin control
thermostat assembly until it locks into place.
16) Replace the panels and baffle in their correct positions.
Thermostat
Capillary
Tubing
Thermostat Extension
Bracket (stainless)
Thermostat Bulb
Attachment Removed
from Upper Unit
Thermostat Bulb
Attachment of
Lower Unit
Thermostat Bulb
Fig. 6 Fig. 7