


23
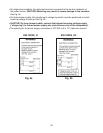
d. Tighten the connection with a wrench until it is tight. At this point, the nut has
covered most of the threads on the male tting.
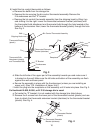
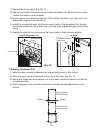
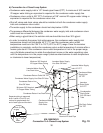
e. Mark a reference line on the female coupling and the remote condenser unit or
icemaker panel. Using a backup wrench on the back of the female coupling, tighten
the six-sided nut of the female coupling an additional 1/6 turn. See Fig. 14.
3)Ifyoulengthenedthelinesetasoutlinedin"II.G.4.a)(1)FactoryLineSetModication"
anditexceeds66feet,see"II.G.5RefrigerantCharge(LineSetExceeding66Feet)"for
proper charging of the unit.
(1) Factory Line Set Modication
1) Recover the line set charge through the Schrader access ports on the Parker quick
connect couplings and store it in an approved container. Do not discharge the
refrigerant into the atmosphere. Remove the extra line set length or add extra tubing.
When adding extra tubing, insulate the additional copper tubes separately. Braze the
connections.
2) Use an electronic leak detector or soap bubbles to check for leaks. Add a trace
of refrigerant to the lines through the Schrader access ports on the Parker quick
connect couplings (if using an electronic leak detector), and then raise the pressure
using nitrogen gas (140 PSIG). WARNING! DO NOT use R-404A as a mixture with
pressurized air for leak testing.
3) Evacuate through the Schrader access ports on the Parker quick connect couplings and
charge with R-404A refrigerant vapor to a pressure of 15 to 30 PSIG. Go to step 2 in
"II.G.4.a)FactoryLineSetInstallation."
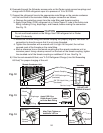
b) Field Fabricated Line Set Installation
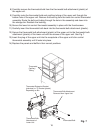
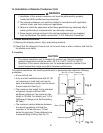
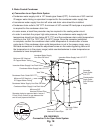
1)Routea5/8"ODcoppertubedischargelineanda3/8"ODcoppertubeliquidline
between the remote condenser unit and the icemaker. Leave a service loop behind the
icemaker to allow the icemaker to be pulled out for service. See Fig. 12.
Note: The service loop is not considered an oil trap.
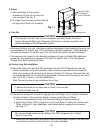
CAUTION
1. Ensure that there are no traps and no kinks in the line set.
2. Do not coil extra line set. Fabricate the line set to the proper length.
2) Insulate the two copper tubes separately.
3) Install Parker quick connect couplings on each end. OS-QUICK, a universal quick
connect coupling kit available as optional equipment from Hoshizaki America, is
recommended. CAUTION! Before brazing, remove the Schrader valve core from the
access port. When brazing, protect the coupling by using a wet cloth to prevent
the coupling from overheating. Do not use silver alloy or copper alloy containing
arsenic.
4) Allow the coupling to cool, then replace the Schrader valve core.
5) Use an electronic leak detector or soap bubbles to check for leaks. Add a trace
of refrigerant to the lines through the Schrader access ports on the Parker quick
connect couplings (if using an electronic leak detector), and then raise the pressure
using nitrogen gas (140 PSIG). WARNING! DO NOT use R-404A as a mixture with
pressurized air for leak testing.