


19
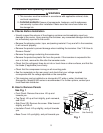
1. Cleaning Procedure
1) Dilute 16 . oz. (473 ml) of recommended cleaner Hoshizaki "Scale Away" or
"LIME-A-WAY" (Economics Laboratory, Inc.) with 3 gal. ( 11 l) of warm water.
) Remove all ice from the evaporator and the storage bin.
Note: To remove cubes on the evaporator, turn off the power supply and turn it back on
after 3 minutes. The harvest cycle starts and the cubes will be removed from the
evaporator.
3) Turn off the power supply.
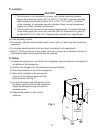
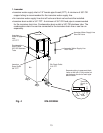
4) Remove the front panel, then remove the insulation panel by lifting up the panel slightly
and pulling it towards you.
5) Remove the base cover, then disconnect one end of the pump tubing to drain the water
tank. See Fig. 7. After the water tank has drained, reconnect the pump tubing.
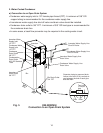
6) In bad or severe water conditions, clean the oat switch assembly as described below.
Otherwise, continue to step 7.
a. Disconnect the vent tube and the ush tube from the top of the oat switch, then
remove the oat switch assembly. Remove the rubber boot from the bottom of the
assembly.
b. Remove the retainer rod from the bottom of the oat switch housing, then remove
the oat. Be careful not to bend the retainer rod excessively when removing it.
c. Wipe down the oat switch housing, shaft, oat, and retainer rod with cleaning
solution. Clean the inside of the rubber boot and hose with cleaning solution. Rinse
the parts thoroughly with clean water.
d. Reassemble the oat switch assembly and replace it and the rubber boot in their
correct positions. Reconnect the vent tube and the ush tube.
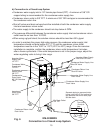
7) Pour the cleaning solution into the water tank.
8) Fully open the cleaning valve on the left side wall of the machine compartment.
9) Move the control switch on the control box to the "WASH" position.
10) Replace the insulation panel and the front panel in their correct positions.
11) Turn on the power supply to start the washing process.
1) Turn off the power supply after 30 minutes.
13) Remove the front panel.
14) Disconnect one end of the pump tubing to drain the water tank. After the water tank has
drained, reconnect the pump tubing.
15) Move the control switch to the "ICE" position.
16) Close the cleaning valve.
Note: The icemaker will not operate unless the cleaning valve is completely closed.
17) Replace the front panel in its correct position.
18) Turn on the power supply to ll the water tank with water.
19) Turn off the power supply after 3 minutes.
0) Remove the front panel and fully open the cleaning valve.