


25
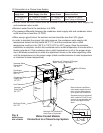
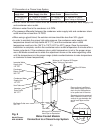
2. Checks Before Installation
1) Remove the shipping carton, tape, and packing material.
2) Check that the refrigerant lines do not rub or touch lines or other surfaces, and that the
fan blade moves freely.
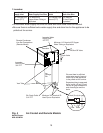
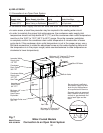
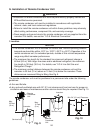
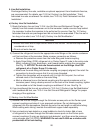
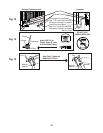
3. Setup
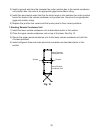
1) Assemble 2 sets of legs using the legs, bolts, and nuts provided. See Fig. 11.
2) Position 1 of the plates provided between a set of legs and the remote condenser unit,
then secure the legs to the remote condenser unit with the bolts and nuts provided.
Repeat on the other side with the remaining set of legs.
3) The bottom of each leg has a mounting hole. Secure the legs to the permanent site with
4 bolts (not included).
Fig. 11
Bolt with Split Lock
Washer and Flat Washer
Nut
Plate
Leg
Bolt with Split Lock
Washer and Flat Washer
Nut
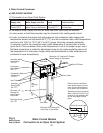
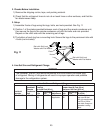
4. Line Set Size and Refrigerant Charge
NOTICE
The icemaker, line set, and remote condenser unit must contain the same type
of refrigerant. Mixing of refrigerants will result in improper operation and possible
damage to the refrigeration system.
Line Set Size and Refrigerant Charge
Hoshizaki
Icemaker
Hoshizaki
Remote
Condenser
Unit
Line Set
Up to 66 Feet (20 m)
Line Set
Greater than 66 Feet (20 m)
Maximum 100 Feet (30.5 m)
Liquid
Line
Discharge
Line
Charge
Adjustment
Liquid
Line
Discharge
Line
Charge Adjustment
(R-404A)
KML-631MRH URC-9F 3/8"
OD
1/2" OD Not
Applicable
3/8"
OD
1/2" OD Add 0.4 oz. for each
foot over 66 feet
(40g for each meter
over 20m). Write
new total charge on
icemaker's rating
label.