


Electronic Clock &
Automatic Cooking Feature
11
When you first switch on the appliance you will be prompted to set the ‘Time of Day’ on
the display. You must ensure you have done this before attempting to use the
automatic cooking feature.
The main oven can be controlled automatically.
- Select food which will require the same cooking time and temperature.
- To ensure food does not cool down and require reheating, set the end
time so the food is ready when you require it.
- Always ensure that meat and poultry is defrosted before placing in the
oven.
- Whenever possible, take food out of the refrigerator and keep it as cool
as possible.
- If cooking food that requires frying before placing in the oven for
automatic cooking, keep the delay time to a minimum.
- Never place hot or warm food in the oven for delayed start cooking as it
could cause the oven to be warm and produce harmful bacteria in the
food.
- We advise that dishes containing left-over cooked poultry and meat, eg.
shepherds pie, should not be cooked automatically if there is to be a delay
period.
- Ensure that delay start times are kept to a minimum to prevent bacterial
growth in food.
- Wine or beer may ferment and cream may curdle during the delay period,
so it is best to add these ingredients just before serving.
- Foods which discolour should be protected by coating in fat or tossing in
water to which lemon juice has been added, prior to placing food in the
oven.
- Dishes containing liquid should not be filled too full to prevent boiling over.
- Food should be well sealed (but not airtight) in a container to prevent the
loss of liquid during cooking. Aluminium foil gives a good seal.
- Always ensure that food is piping hot and cooked thoroughly before
serving.
- Only reheat food once.
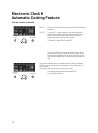
AUTOMATIC COOKING
STEP 1. Check the electricity supply to the cooker is turned
on.
STEP 2. When switched on the display will show both 00:00
and the ‘set time’ symbol flashing. Wait until these
stop flashing.
STEP 3. Press the Time/Mode button once, so that the ‘Set
Time’ symbol and the display are flashing. Turn the
+/- control knob until the correct hour is set.
STEP 4. Press the Time/Mode button once, so that the ‘Set
Time’ symbol and the display are flashing. Turn the
+/- control knob until the correct minutes are set.
Press the Time/Mode button again.
TIME OF DAY IS NOW SET.
To alter the time of day after the first setting, simply
press the Time/Mode button. The ‘Set Time’ symbol
and the display will flash. Repeat STEPS 3 and 4.
SETTING THE TIME OF DAY:
HINTS ON AUTOMATIC
COOKING
-
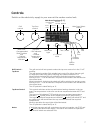
+
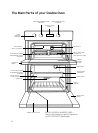
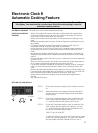
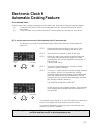
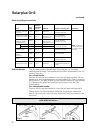
Main Oven
Light
Time/Mode