


7
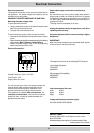
The programmer makes it possible to preset the oven and the
grill in terms of:
• delay start with a preset length of time for cooking;
• immediate start with a preset length of time for cooking;
• timer.
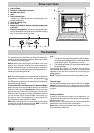
Button functions:
: Timer with hour and minutes;
$
: Length of cooking time;
%
: End cooking time;
(
: Manual change;
)
: Change time (backwards);
*
: Change time (forwards).
How to Reset the Digital Clock
After the appliance has been connected to the power source
or following a power outage, the clock display will begin to blink
and read: 0:00
• Press the
$
and
%
buttons at the same time. Then use
(within 4 seconds) the
)
and
*
buttons to set the
exact time.
Use the
*
button to move the time forwards.
Use the
)
button to move the time backwards.
The time can also be changed in the following two ways:
1. Repeat all of the foregoing steps.
2. Press the
(
button, and then use the
)
and
*
buttons
to reset the time.
Manual Operation Mode for the Oven
After the time has been set, the programmer is automatically
set to manual mode.
Note: Press the
(
button to return the oven to manual mode
after every “Automatic” cooking session.
Delayed Start Time with Preset Cooking Length
The length and the end cooking times must be set. Let us
suppose that the display shows 10:00.
1. Turn the oven control knob to the cooking setting and tem-
perature desired (example: convection oven at 200°C).
2. Press the
$
and the use (within 4 seconds) the
)
and
*
buttons to set the length of the cooking time. Let us
suppose that 30 minutes was set for the length of the cook-
ing time. In this case, the display will show:
+
Release the button, and within 4 seconds, the current time will
reappear with the
m
symbol and “auto.”
3. Press the
%
button, and then use the
)
and
*
buttons
to set the end cooking time. Let us suppose that it is 13:00
=
4. Release the button and the display will show the current
time within 4 seconds:
?
When “auto” is lighted, it indicates that the length and end
cooking time have been preset to operate in automatic mode.
At this point, the oven will turn on automatically at 12:30 in
order to finish the cooking session within 30 minutes. When
the oven is on, the
m
symbol (cooking pot) will appear on
the display for the entire length of the cooking process. The
$
button can be pressed at any time to display the setting
for the length of the cooking time, while the
%
button can be
pressed to display the end cooking time.
At the end of the cooking time, an acoustic signal will
sound. Press any button it turn it off (except the
)
and
*
buttons).
Immediate Start Time with Preset Cooking Length
When only the length of the cooking time is set (points 1 and 2
of the paragraph entitled, “Delayed Start Time with Preset Cook-
ing Length”), the cooking session starts immediately.
Cancelling a Preset Cooking Time
Press the
$
button, and use the
)
button to set the time to:
,
Then press the manual cooking mode button
(
.
Timer Feature
The timer can be used to count down from a given length of
time. This feature does not control when the oven comes on or
turns off, but, rather, it only emits an acoustic signal when the
preset time has run out.
Press the
button, and the display will read:
,
Then use the
*
and
)
buttons to set the desired time.
Release the button, and the timer will start at that second. The
display will show the current time.
.
At the end of the preset time, an acoustic signal will sound,
which can be turned off by pressing any button (except the
*
and
)
buttons), and the
symbol will turn off.
Changing and Cancelling Settings
• The settings can be changed at any time by pressing the
corresponding button and using the
*
or
)
button.
• When the length setting for the cooking time is cancelled, the
end cooking time setting is also cancelled, and vice versa.
• When in automatic cooking mode, the appliance will not
accept end cooking times prior to the start cooking time pro-
posed by the appliance itself.
Electronic Programmer