


9
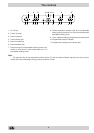
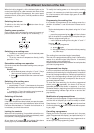
The different function of the hob
When the hob is plugged in, all the indicator lights on the
control panel light up for a few moments and there will be
a short acoustic signal. Subsequently, the control panel
switches off and, at this point, it will be possible to switch
the hob on.
Switching the hob on
To switch on the hob, hold the button down for ap-
proximately 1 second.
Cooking zone operation
Each cooking zone is activated by means of a power ad-
justment device which is made up of a double key (+,-).
Switching on a cooking zone
• To switch on a cooking zone, set the desired power
using the “+” and “-” keys.
• To set the maximum temperature directly, briefly
press the “-” key.
Extendable cooking zone operation
(if the hob comes with extendable cooking zones, see pre-
vious page)
Double plate;
a. set the desired power using the “+” and “-” keys
(the innermost cooking zone is activated).
b. press
to enable/disable the outermost cook-
ing area
Switching off a cooking zone
To switch off a cooking zone:
• press thekeys “+” and “-” simultaneously: the power
immediately returns to 0 and the cooking zone switches
off;
• or press the “-” key: the cooking zone’s power de-
creases progressively until it switches off.
Switching off the hob
Press ; the appliance switches off.
If the hob’s controls have been locked (see previous para-
graph), they will continue to be locked even after the hob
has been switched back on. To switch the hob back on, it
is necessary to unlock the controls.
Locking the controls
When the hob is operating, it is possible to block the con-
trols to prevent the settings from being accidentally modi-
fied (children, cleaning operations, etc.).
All you have to do is press
; the indicator light above
the key lights up and the controls are locked.
To modify the heating power or to interrupt the cooking
process, it is necessary to unlock the controls: press
for a few moments; the indicator light goes off and the
controls unlock..
Programming the cooking time
It is possible to programme all the cooking zones for a
duration of between 1 and 99 minutes. Proceed as fol-
lows:
•
set the desired power on the plate/s using the “+” and
“-” keys;
• press the programming key
until the indicator
light in the position corresponding to the plate that you
intend to programme lights up;
• set the desired cooking time using the “+” and “-”
keys
;
• to confirm the programme
a. press
again
b. wait approximately 10 seconds without pressing
any other keys.
The cooking time countdown begins immediately.
The end of the programmed cooking time is indicated by
means of an acoustic signal (this lasts for 10 seconds)
and the cooking zone switches off.
Repeat the above-mentioned procedure for each plate that
you intend to programme.
Programmed time display
If one or more plates have been programmed, the display
shows the time remaining for the plate which is closest to
the end of the programmed time, indicating its position by
means of the corresponding indicator light, which will be
on. The indicator lights that correspond to the other pro-
grammed plates will flash.
To show the time remaining for the other programmed
plates, press
repeatedly; the times of all the pro-
grammed plates will be shown in sequence, in an anti-
clockwise direction, beginning from the front left one (only
the corresponding indicator light will be on and the dis-
play flashes)
Modification of programmed times
Proceed as per the paragraph “Programmed time display”
until the time of the plate you intend to modify is shown.
Press the keys “+” and “-”
to set the new time.
Confirm by pressing
or wait 10 seconds without press-
ing any keys.
Cancelling a programme
Display the time of the plate concerned (as in the para-
graph “Programmed time display”) and press the keys “+”
and “-”
simultaneously; the programme is re-
set and you exit the programming mode.