


8
GB
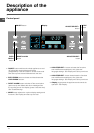
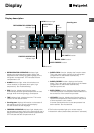
Using the display
Setting the temperature
When the appliance is switched on, the standard
storage temperatures are automatically set:
• +5°C for the refrigerator compartment
• -18°C for the freezer compartment.
The temperatures may be set in the following ranges:
• between +2°C and +8°C for the refrigerator
compartment
• between -18°C and -26°C for the freezer compartment
To set the temperature:
1. Press the MODE button until the value flashes on the
refrigerator or freezer compartment display.
2. To increase the temperature, press the
ADJUST/SELECT+ button.
To decrease the temperature, press the
ADJUST/SELECT- button.
Each time the button is pressed, the value increases or
decreases by 1°C.
3. Confirm the choice by pressing the MODE button
within ten seconds: the value will stop flashing: If the
choice is not confirmed, the previous set temperature
will appear on the display.
! The ECO function reduces the possible adjustments:
from +4°C to +6°C for the refrigerator and from -18°C to -
20°C for the freezer.
Function status
function activated
(green symbol with blue inside lights up)
function selected
(green symbol with red border lights up)
function deactivated
(green symbol only lights up)
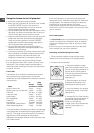
Activating and deactivating the SUPER COOL,
ECO, SUPER FREEZE, ICE PARTY functions.
1. Press the MODE button until the desired function is
selected.
2. To activate it, press the ADJUST/SELECT + button.
To deactivate it, press the ADJUST/SELECT - button.
3. Confirm the choice by pressing the MODE button
within ten seconds. If the choice is not confirmed, the
previously set function will appear on the display.
Once the operation has finished, the red border switches
off.
If the function has been activated: the green symbol with
blue inside lights up. If the function has been
deactivated: only the green symbol lights up.
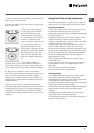
Setting the date and time
The settings are in series and it is not possible to adjust
the date if the time has not been set before:
1. Press the MODE button repeatedly until SET TIME [+/-]
appears on the scrolling text.
2. To scroll forward one hour press the ADJUST/
SELECT+ button. To scroll back one hour press the
ADJUST/SELECT- button.
3. Confirm the choice by pressing the MODE button
within ten seconds. If the choice is not confirmed, the
previously set time will appear on the display.
Once the hours have been set, the minutes, days,
months and years can be set by following steps 1-3.
Setting the language
1. Press the MODE button repeatedly until the language
setting screen appears on the scrolling text display.
2. To scroll forward, press the ADJUST/SELECT + button.
To scroll back, press the ADJUST/SELECT - button.
3. Confirm the choice by pressing the MODE button
within ten seconds. If the choice is not confirmed, the
previously set language will appear on the display.
! The first time the appliance is switched on, the
language setting request screen appears automatically
on the display: follow the above procedure.
Switching off the audio and visual alarms
Press the RESET ALARM button: by pressing it once, the
audio alarms are switched off; by pressing it a second
time, the alarm messages are deleted from the scrolling
text on the display.
! The open door alarm stops automatically when the door
is closed. (
See Troubleshooting
).
! If DEMO MODE appears on the display, the appliance
is in exhibition mode, i.e. it does not cool despite the fact
that the display and the internal lamp are on. To exit this
mode, press the MODE, ADJUST/SELECT+ and
ADJUST/SELECT- buttons and hold for at least three
seconds.