


GB
8
PLEASE PHONE US TO REGISTER YOUR APPLIANCE AND ACTIVATE YOUR PARTS GUARANTEE ON 08448 24 24 24
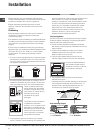
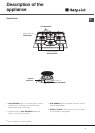
! The position of the corresponding gas burner or
electric hotplate* is shown on every knob.
Gas burners
Each burner can be adjusted to one of the following
settings using the corresponding control knob:
• Off
Maximum
Minimum
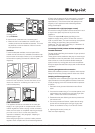
To light one of the burners, hold a lit match or lighter
near the burner and, at the same time, press down
and turn the corresponding knob anti-clockwise to the
maximum setting.
Since the burner is fitted with a safety device, the
knob should be pressed for approximately 2-3
seconds to allow the automatic device keeping the
flame alight to heat up.
Some models are equipped with an ignition switch
incorporated into the control knob. If this is the case,
the ignitor is present (the
symbol is located
near each knob).
To light a burner, simply press the corresponding
knob all the way in and then turn it in the counter-
clockwise direction to the "High" setting, keeping it
pressed in until the burner lights.
! If a flame is accidentally extinguished, turn off the
control knob and wait for at least 1 minute before
trying to relight it.
To switch off the burner, turn the knob in a clockwise
direction until it stops (when reaches the “•” position).
Practical advice on using the burners
To ensure the burners operate efficiently:
• Use appropriate cookware for each burner (see
table) so that the flames do not extend beyond
the bottom of the cookware.
• Always use cookware with a flat base and a cover.
• When the contents of the pan reach boiling point,
turn the knob to minimum.
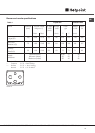
Burner
Fast (R)
Semi Fast (S)
Auxiliary (A)
Ø Cookware Diameter (cm)
24 - 26
16 - 20
10 - 14
To identify the type of burner, refer to the designs in
the section entitled, "Burner and Nozzle
Specifications".
Start-up and use