


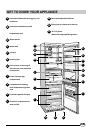
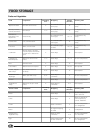

GETTING YOUR APPLIANCE READY FOR USE
NOTICE
After the appliance has been delivered, stand it in the
upright position and wait approximately 3 hours before
connecting it to the electrical outlet to guarantee that it
operates properly.
Before placing foodstuffs in the refrigerator or freezer, clean
the interior well with warm water and baking soda.
Motor protection delay
This model is provided with a motor protection control
system. Therefore, if the compressor does not start
immediately upon installation, do not worry as it will start
automatically after approximately 8 minutes.
This is also what will happen every time the power
supply is interrupted, both due to a power failure or
should you switch it off yourself (to clean or defrost
your freezer, for example).
After plugging the appliance into a suitable electricity socket,
ensure the display is on with the “OFF” words in the indication
spaces concerning the two compartments (fridge and freezer).
Freezer compartment
When the appliance is switched on (by pressing the ON/
OFF button “A” for more than two seconds), the freezer
compartment is automatically brought to the standard setting
of - 18°C. We recommend you select the SUPER FREEZE
function to speed up the cooling process of the compartment,
when the latter has reached its optimal temperature, the
function shall be automatically disabled and you may place
your frozen food inside the freezer.
Refrigeration compartment
When the appliance is switched on, the refrigerator
compartment turns on automatically, and it is brought to the
standard setting of + 5°C. We recommend you select the
SUPER COOL function to speed up the cooling process of
the compartment, after a few hours, you may place food
inside the refrigerator.
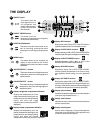
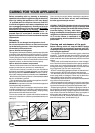
Language setting:
The first time you switch the appliance on you will be given a
choice of five languages. The appliance is factory-set to
English, if this is the language you require you need not do
anything. However if you want Italian, French, Spanish or
Portuguese you can change the language setting using the
scrolling text on the display (P)
First press the MODE (D) button as many times as
necessary for the scrolling text “IMPOSTAZIONE LINGUA
[+/-] / CHOIX LANGUE [+/-] / SET LANGUAGE [+/-] /
SELECCIONAR IDIOMA [+/-] / PROGRAMAÇÃO
LÍNGUA [+/-]” to come up on the display.
Now you can choose the language using the ADJUST/
SELECT + (E) (scrolls forward in the list of languages
available that appear in the form of scrolling text) and/or
ADJUST/SELECT - (F) (scrolls back in the list of languages
available that appear in the form of scrolling text) buttons.
Once the language you wish to select has appeared in the
scrolling text, confirm the setting by pressing the MODE (D)
button again: the language is now set.
NOTE: if you do not confirm your selection by pressing the
MODE (D) button within ten seconds display shall go back
to the language previously set and will show that no
modification has been made.
NOTE: You can change the language setting at any time.
Setting the time and date:
The time and date settings are in rapid sequence and you
cannot set the date without first setting the time.
Press the MODE (D) button as many times as necessary
for the words “SET TIME [+/-]” to appear in the form of
scrolling text.
Now you can set the exact time using the buttons ADJUST/
SELECT + (E) (to go up one hour at a time) and/or
ADJUST/SELECT - (F) (to go back one hour at a time).
Once you have reached the time to set, confirm the setting
by pressing the MODE (D) button once more, you should
now set the minutes using the same procedure.
Once you have set the correct time, you should set the day
and then the month and year, using the same procedure:
buttons ADJUST/SELECT + (E) and ADJUST/SELECT
- (F) for the exact digit and again the MODE button to confirm.
NOTE: if you do not confirm your selection by pressing the
MODE (D) button within ten seconds of the last action
performed, the display will show the setting previously made
and indicate that no modification has been made.