


GB
11
PLEASE PHONE US TO REGISTER YOUR APPLIANCE AND ACTIVATE YOUR PARTS GUARANTEE ON 08448 24 24 24
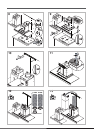
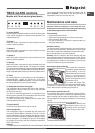
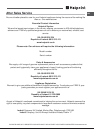
TBOX-GLASS controls
Models with Touch control glass (basic)
T1 T2 T3 T4 T5 T6 T7 T8
T1 motor ON/OFF
When the button is pressed with the hood off, the fi rst speed
is set. When the button is pressed during operation, the
hood switches OFF.
T2 Speed 1
When the button is pressed the hood switches from the
previous status to speed 1.
T3 Speed 2
When the button is pressed the hood switches from the
previous status to speed 2.
T4 Speed 3
When the button is pressed the hood switches from the
previous status to speed 3.
T5 Booster
When the button is pressed the hood switches from the
previous status to intense speed. The setting is limited by
time; when the time elapses the hood goes back to the speed
set previously; when a speed button is pressed (T2, T3 or
T4), the selected speed is set as you leave the booster mode.
T6 Timer
By pressing T6 once, a timer setting can be associated to
each speed [V](V1 – 30 min, V2 – 20 min, V3 – 10 min), after
which the hood turns OFF automatically. The timer can be set
for manual speeds only and not for the booster.
T7 Antigrease and odour fi lter signal
The antigrease (A) and odour (B) fi lters need cleaning/
replacing after a certain number of hours of use (the latter
for fi ltering hoods only).
The time for cleaning/replacement is signalled by the
fl ashing of the coloured LED associated to the fi lter (white
for antigrease fi lters, red for odour fi lter).
The LED is turned off by pressing the T7 button after
cleaning/replacing the fi lters.
T8 lights ON/OFF
It turns the work lights of the hood on and off.
Hood confi guration
The confi guration menu is accessed with the product off
by pressing T5 and T6 for 6 seconds. T7 turns on at this
point to indicate the type of installation through two colours
of the LED: white for extractor installation (default), red for
fi ltering installation. The installation type can be changed
by pressing T7 cyclically with the consequent alternation
of the LED colours.
Hood off
The hood can be turned off manually by pressing the T1
button (ON/OFF). If the timer is set, the hood turns off
automatically when the set time runs out.
Maintenance and care
Caution! Before cleaning or servicing the unit,
disconnect it from the mains by pulling the power plug
or disconnecting the main circuit breaker.
First cleaning
• Remove the protective fi lm
• Clean with a damp sponge and a little neutral soap
• Rinse off with a damp cloth
• Dry with a soft cloth; if the hood is stainless steel, dry
along the metal's grain
Periodic cleaning
The hood must be cleaned frequently (at least as often as
you service the grease fi lter), inside and out. Use a damp
cloth and a neutral liquid detergent with lukewarm water.
Do not use abrasive or corrosive products.
Warning: Failure to observe the hood cleaning and fi lter
cleaning/replacement instructions can result in fi res. Follow
the instructions carefully. The manufacturer is not liable for
any damage to the motor or fi res caused by incorrect care
or failure to follow the above instructions.
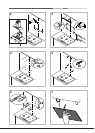
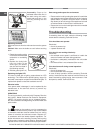
Servicing the grease fi lter (A)
The grease fi lter retains the
particles of grease produced
during cooking; it must be
cleaned at least once a month
with a non-aggressive
detergent, either by hand or
with a low temperature, short
dishwasher cycle.
To extract the grease fi lter,
pull the spring loaded handle.
If washed in a dishwasher, the metal fi lter may change
colour, but this does not affect its performance.
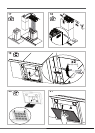
Servicing the charcoal fi lter (B)
The charcoal fi lter retains unpleasant cooking odours.
The fi lter saturates after a variable time, depending on the
type of cooking and how often the grease fi lter is cleaned.
The cartridge must be replaced at least once every twenty
months.
This fi lter can NOT be washed or regenerated
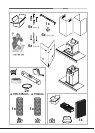
Disassembly: Remove the
activated-carbon filter by
pressing the two front levers
which secure it to the hood.
A
B