


10
GB
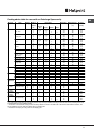
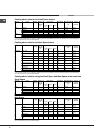
Practical cooking advice
MULTILEVEL
Use positions 1, 3, 5 and 6.
Place the dripping pan at the bottom and the rack at
the top.
BARBECUE
Preheat the oven for 5 minutes.
Keep the oven door closed when cooking in this
mode.
Place the dripping pan on shelf level 3. Place the
rack in a position between 4 and 7, depending on
how bulky the food is, and make sure the food is in
the centre of the rack. Examples: beef ribs should
be cooked on shelf level 4 and bacon on shelf level
6 or 7.
PIZZA or FOCACCIA
Use a light aluminium tray with a maximum diameter
of 30 cm, placing it on top of the rack supplied.
If the pizza has a lot of toppings, we recommend
adding the mozzarella cheese on top of the pizza
halfway through the cooking process.
GRILL
Preheat the oven for 5 minutes.
Fit the DIVIDER to the DIVIDER rack D.
Keep the oven door closed when cooking in this
mode.
Place the rack in position 7. Position the food in the
centre of the rack. Position the dripping pan on shelf
level 6.
This function is particularly suitable for browning
food, cooking gratins, colouring meringues, making
toasted sandwiches and grilling small quantities of
thin, lean meat.
We recommend that the power level is set to
maximum. The top heating element is regulated by
a thermostat and may not always operate
constantly.
FAST COOKING
Preheat the oven, making sure the dripping pan is
on shelf level 6.
When cooking frozen foods, always follow the
instructions on the packaging.
6. If a blackout occurs while the oven is already in
operation, an automatic system within the appliance
will reactivate the cooking function from the point at
which it was interrupted, as long as the temperature
has not dropped below a certain level. Programmed
cooking modes which have not started will not be
restored and must be reprogrammed.
Programming cooking
A cooking function must be selected before
programming can take place.
Programming is possible in all oven configurations:
EXTRALARGE, MAIN and SMALL SPACE, even if the
latter two are being used simultaneously.
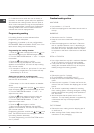
Programming the cooking duration
1. Press the
button several times until the icon
and the three digits on the DISPLAY begin to flash.
2. Turn the TIMER KNOB towards + and - to adjust
the duration.
3. Press the
button again to confirm.
4. When the set time has elapsed, the text END
appears on the DISPLAY, the oven will stop cooking
and a buzzer sounds.
For example: it is 9:00 a.m. and a time of 1 hour and
15 minutes is programmed. The function will stop
automatically at 10:15 a.m.
Setting the end time for a cooking mode
A cooking duration must be set before the cooking
end time can be scheduled.
1. Follow steps 1 to 3 to set the duration as detailed
above.
2. Next, press the
button until the icon and the
three numerical digits on the DISPLAY begin to flash.
3. Turn the TIMER KNOB towards + and - to
adjust the hour value.
4. Press the
button again so that the other two
numerical digits on the DISPLAY begin to flash.
5. Turn the TIMER KNOB towards + and - to
adjust the minute value.
6. Press the
button again to confirm.
7. When the set time has elapsed, the text END
appears on the DISPLAY, the oven will stop cooking
and a buzzer sounds.
Programming has been set when the
and icons
flash. The DISPLAY shows the cooking end time and
the cooking duration alternately.
To cancel programming, turn the FUNCTION knob to
the 0 position.