


7
GB
The electronic
cooking programmer
This feature allows you to program the oven or the grill
as follows:
delayed cooking time for a specified period;
immediate start for a specified period;
timer.
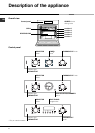
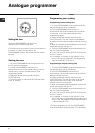
Button Functions:
H
: Timer with hours and minutes;
$
: cooking time;
%
: end cooking time;
(
: Manual change;
) : set cooking time (to count down);
*
: set cooking time (to start from zero)
How to reset the digital clock
After the appliance has been connected to the power
supply, or after a power cut, the clock display will
automatically reset to 0:00 and begin to blink.
Press the
$ and % buttons simultaneously, release,
and then set the exact time (within 4 seconds) using
the ) and * buttons.
The button
* advances the hours.
The button
) decreases the hours.
The time can also be changed in the following two
ways:
1. Repeat all of the steps above.
2. Press the
( button, release, and then use the ) and
* buttons to update the time.
Manual operation of the oven
Once the time has been set, the programmer
automatically switches to manual mode.
Note: Press the ( button to restore the manual mode
after every Automatic cooking session.
Delayed cooking time for a specified period
The total cooking time as well as the time at which the
cooking will finish must be set. If we assume that the
time display reads10:00:
1. Turn the oven control knob to the setting and tempera-
ture desired (example: static oven mode at 200°C).
2. Press the button $ button, release, and then set the
desired cooking duration (within four seconds) using
the ) and * buttons. Supposing the cooking duration
is set at 30 minutes, the display will read as follows:
+
Once the setting process is complete, after 4 seconds the
current time will reappear, along with the m symbol and the
text auto
3. Press the button % button, release, and then use the
) and * buttons to set the desired cooking end time.
Let us suppose this time is 1:00 p.m.
=
4. Once the setting process is complete, after
approximately 4 seconds the current time will be
displayed:
?
When auto is on, it indicates that the length of
cooking time and the time it is due to finish have been
programmed in automatic mode. At this point, the
oven will turn on automatically at 12:30 and turn off
after 30 minutes. When the oven is turned on, the
symbol m will be displayed for the entire cooking time.
The cooking duration can be displayed at any time by
pressing the button $ , and the time it is due to finish
may be displayed by pressing the button % .
Once cooking is completed, the timer will ring; to turn
it off, simply press any button except the ) and *
buttons.
Immediate start for a specified period
By programming just the duration (points 1 and 2 of the
Delayed cooking time for specified period section),
cooking will begin immediately.
To cancel a cooking schedule already programmed
Press the $ button, release, and use the ) button to
reset the time to
,
then press the manual cooking mode button (.
Timer Feature
The timer feature allows you to enter a specific amount
of time and begins to count down. This feature does not
turn the oven on or off; it merely sounds when the time
has elapsed.
If the H button is pressed and released the following
appears:
,
Then use the * and ) buttons to set the desired time.
As soon as the setting process is complete, the timer
will start to count down and the current time will appear
on the display.
.
After the time has expired, an audible signal will be
emitted, which can be turned off by pressing any button
(except the * and ) buttons). At this point the symbol
H will also turn off.
Correction/Cancellation of data
The data entered can be changed at any time by
pressing the corresponding button and the * or )
buttons.
When the data for the cooking duration is cancelled,
the data for the time cooking is due to end is also
cancelled automatically, and vice versa.
If the oven has already been programmed, it will not
accept times for the end of cooking which are before
the start of the programmed cooking process.