


Rev. 0708
3
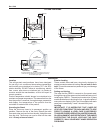
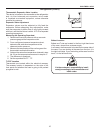
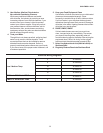
Cut and Plan Views
FMSS
Front-Mount Self-Service case. Can be ordered to mount in front
of ANY service case. Base height can be modified to match any
service case bumper height.
ASC
PARENT CASE
FMSS
Height Modified to
match the ASC case
20"
“Field” Close Off
FMSS-L
Self-Service
Remote (Self Contained)
Scale = 1"
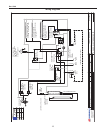
16'' Remote
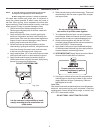
21
1
/
2
" S.C.
*26
3
/
8
"
*Dimensions
adjust at theses
points to match
service case
height
13
1
/
2
"
11
3
/
4
"
*10
1
/
2
"
6
1
/
8
"
26'' Remote
28
5
/
8
" S.C.
3
7
/
8
" Remote
8
7
/
8
" S.C.
F
a
n
4'
(VARIABLE LENGTHS)
3
1
/
2
"
4
1
/
2
"
12
1
/
2
"
24"
9
7
/
8
"
16"
(21
1
/
2
"
S.C.)
2
5
/
8
"
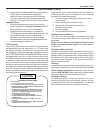
Ref. Drop In
Elec.
Drain
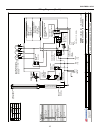
FMSS-L
Plan View
Scale = 1/2"
Installation
Location
The refrigerated merchandisers have been designed
for use only in air conditioned stores where temperature
and humidity are maintained at or below 75°F and 55%
relative humidity. DO NOT allow air conditioning, electric
fans, ovens, open doors or windows (etc.) to create air
currents around the merchandiser, as this will impair its
correct operation.
Product temperature should always be maintained at a
constant and proper temperature. This means that from the
time the product is received, through storage, preparation
and display, the temperature of the product must be
controlled to maximize life of the product.
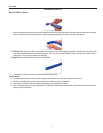
Uncrating the Stand
Place the xture as close to its permanent position as
possible. Remove the top of the crate. Detach the walls
from each other and remove from the skid. Unbolt the case
from the skid. The xture can now be lifted off the crate
skid. Lift only at base of stand!
Exterior Loading
These models have not been structurally designed to
support excessive external loading. Do not walk on their
tops; This could cause serious personal injury and damage
to the xture.
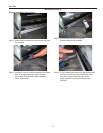
Setting and Joining
The case that the FMSS-L connects to (the parent case)
through the rear of the case must be leveled and set prior to
installing the FMSS-L. The sectional construction of these
models enable them to be joined in line - to give the effect of
one continuous display. A joint Trim Kit is supplied with each
case line to cosmetically “mask” the sectional joints.
Leveling
IMPORTANT! IT IS IMPERATIVE THAT CASES BE
LEVELED FROM FRONT TO BACK AND SIDE TO SIDE
PRIOR TO JOINING. A LEVEL CASE IS NECESSARY
TO INSURE PROPER OPERATION, WATER DRAINAGE,
GLASS ALIGNMENT, AND OPERATION OF THE HINGES
SUPPORTING THE GLASS. LEVELING THE CASE
CORRECTLY WILL SOLVE MOST HINGE OPERATION
PROBLEMS.