


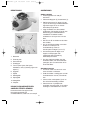
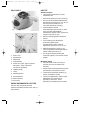
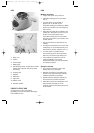


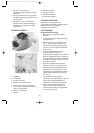

KEY
1. Basic unit
2. Switch
3. Control light
4. Melting pot
5. Moulds (large heart, small hearts, coffee
beans, bear, squares, Christmas trees
and stars)
6. Cooling rack
7. Spatula
8. Metal fork
9. Spiral fork
10. Plastic forks
11. Wooden skewer
PRIOR TO FIRST USE
Check that you have removed all
packaging from the chocolate melting pot
both inside and out.
USE
Melting chocolate
• Plug in and switch the current on.
• Place the melting pot (4) in the basic
unit (1).
•Turn the switch (2) to position II
(approx. 60° C) to heat up the
chocolate melting pot. Heating up takes
around 10 minutes. The control light (3)
will come on.
• Place the chocolate to be melted in the
melting pot. Be careful not to burn your
fingers on the metal parts of the
chocolate melting pot. The chocolate
will melt more quickly if you break it into
smaller pieces.
• Stir the chocolate occasionally as it is
melting.
•To keep the chocolate warm once it has
melted (e.g. for chocolate fondue), turn
the switch to position I (approx. 43° C).
•Turn the switch to position 0 and
remove the plug from the wall socket
after use. The control light will go out.
• If the melted chocolate is not to be
used immediately, but is to be
processed further, you should transfer it
to another container.
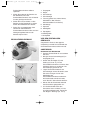
Using the moulds
• The moulds must be dry and clean
before pouring in chocolate.
• Melt the chocolate in the melting pot
and pour the chocolate mass into the
mould as precisely as possible.
•Spread it evenly using the spatula (7),
and remove any excess chocolate.
• Place the mould in the refrigerator until
the chocolate is totally set. Then
carefully press the chocolate pieces out
of the mould.
12
1.
2.
4.
5.
6.
7.
8.
9.
10.
11.
3.
ELE01210-1_IM 20/07/04 8:52 Side 12