


36
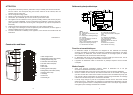
1. Seau de stockage de l'eau
2. Lampe d'indicateur de réfrigérant (Vert)
3. Lampe d'indicateur de chauffage (Rouge)
4. Robinet de sortie d'eau froide (Bleu)
5. Robinet de sortie d'eau chaude (Rouge)
6. Plateau d'eau
7. Cavité de stockage
8. Interrupteur de chauffage (rouge)
9. Interrupteur de réfrigérant (Vert)
10. Ridoir de robinet de fuite
11. Fuselage
12. Cable d'alimentation
13. Gril de dissipateur thermique
Construction et nom
Function and characteristics
1. The dispenser adopts advanced compressor refrigeration and heating methods, installs full
automatic temperature controller. It is with light weight, no pollution, low noise, fine safe
function, quich heating, high heat efficiency, low power consumption.
2. The dispenser can supply ice cool water and hot boiled water for making tea, coffee and cold
drink. It is suitable for families, office,etc..
3. The appearance of the dispenser uses full plastic construction and is new in design.
Using methods
1. After disassembled the outer package, put the dispenser on the flat ground and the back of
the dispenser should be 15cm from the wall.
2. Put the clean water bottle with clever cap down to the clever stand.
3. Open the heat water tap, it will emerge air bubbles in the bottle. It means the water is flowing
into the hot water bucket. Push down the hot water valve continuely until the water flowing
out. Switch on the heating power switch, the red heating indicator lamp lights on at the time,
it will begin to heating.
4. When the red lamp changes into yellow, it means the temperature of the water in hot water
o
bucket had reached about 95 C, the heating power had turn off,the bucket is in warm-
o
keeping state. When the temperature drops to 85 C, the red lamp lights on, it means heating
starts again.
5. When using compressor regrigeration, switch on the refrigeration power switch, the green
indicating lamp lights on, it will begin to refrigerate.
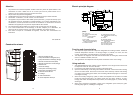
RD
K2
K1
FR
KT1 KT2
R1
R2
D1
D2
LED1
LED2
D3
TWK
MQ
YM GB
S
E
N
L
Electric principle diagram
(Note)
RD - Fuse (15A)
K1 - Heating power switch (Red)
FR - Heater
KT1, KT2 - Jump temperature
control switch
D1, D2 - Diode
LED1 - Heating & Keeping warm
indicator lamp (Red & Yellow)
R1 - Metal film resistor
K2 - Refrigeration power switch
LED2 - Refrigeration indicator lamp
(Green)
D3 - Diode
R2 - Metal film resistor
TWK - Adjustable temperature
control switch
MQ - Motor start-up implement
YM - Compressor motor
GB - Over load protector
Attention
1. Ce produit est une machine d'équilibre. Veuillez sortez les 2 pièces des parties métaux et les
accessoires du carton. Utilisez les vis de 4*12mm pour fixer les parties métaux sur la
machine et vis de 5*20mm pour fixer la machine sur la terre.
2. Ne pas mutiler le système de réfrigération.
3. Veuillez utiliser le type de la bonde correcte et la méthode propre pour éviter l'incendie.
4. Accessoires : 2 tranches Z, 4 vis de 4*12mm, 2 vis de 5*20mm.
5. Cet appareil n'est pas destiné à être utilisée par les personnes (y compris les enfant) ayant
des capacités physique, sensorielle ou mentale réduites, ou le manque d'expérience et de
connaissance, à moins qu'ils aient été donnés de surveillance ou d'instructions concernant
l'utilisation de l'appareil par une personne responsable de leur sécurité.
6. Les enfants doivent être surveillés pour assurer qu'ils ne jouent pas avec cet appareil.
7. Si le cordon d'alimentation est endommagé, il doit être remplacé par le fabricateur, les
personnes de son agent de service ou de même qualification, afin d'éviter le risque.
8. Pour éviter le risque dû à l'instabilité de l'appareil, il doit être fixé conformément aux
instructions
TOP QUALITE