


2
92254
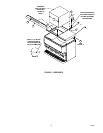
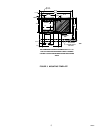
2. Place the icemaker adapter lid assembly (item 1) on top of the dispenser and position it flush with the rear
and sides of the dispenser as shown in Figure 1.
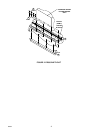
3. Install the ice baffle on the lid assembly as shown in Figure 3.
IMPORTANT: The baffle prevents ice from over–filling the manual fill area during agitation/dispensing
with a full storage bin and forcing the manual fill cover off.
4. Using the slotted holes in the lid as a template, drill (4) .147 diameter holes (#26 drill) at the bottom of the
slots (see Figure 1 Detail A). BE CAREFULLY NOT TO DRILL INTO THE ICE STORAGE BIN. Secure the
lid to the dispenser with (4) #10 sheetmetal screws.
5. Seal the icemaker to the dispenser lid as follows (see Figure 1).
A. Run beads of RTV around the opening in the lid and inside of the perimeter of the ice maker outline so
that the ice maker will set on the RTV.
B. Set the ice maker onto the lid and position it as shown in Figure 1.
C. Wipe away the excess RTV.
6. Drill .147 diameter holes into the ice maker cabinet and the dispenser lid using the icemaker mounting
brackets as templates. USE CAUTION SO AS NOT TO DRILL INTO ANY ICEMAKER COMPONENTS
(CONDENSER, TUBING, ETC.). Secure the brackets using the #10 sheetmetal screws provided.
7. Follow the icemaker manufacturer’s instructions to complete the installation of the ice maker including the
bin thermostat if so equipped or required.
IMPORTANT: For Scotsman CM series icemakers with sonic ice level control, Bin Thermostat Kit KSB1
must be ordered with the icemaker.
CAUTION: The bin thermostat location must not interfere with agitator rotation.
8. Locate the cleaning caution label (item 5) on the manual ice fill cover (item 4) as shown in Figure 1. Place
the manual fill cover in position over the flange on the lid assembly and the front access hopper opening.