


EIMI Cornelius Inc; 2001–03
January 13, 2002
620919549
Revision D
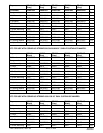
7. Gasket 620050102 620050102 620050102 620050102 620050102 103”
8. Label 90221 90221 90221 90221 90221 1
9. Acorn Nut, Nylon 620701902 620701902 620701902 620701902 620701902 2–4
10. Sealing Washer 620701901 620701901 620701901 620701901 620701901 2–4
11. Nylon Washer 621701903 621701903 621701903 621701903 621701903 2–4
IMPORTANT: For DF/ED300 models, adjust the automatic agitation timer located in the dispenser’s
electrical control box to 5 seconds on, 20 minutes off. Access to the timer is provided by removing the
merchandiser/upper front panel.
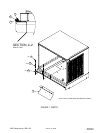
1. Unpack kit. Refer to Figures 1 and 2 for component detail.
2. Insert the ice baffle (item 3) into the lid assembly (item1) (Figures 1).
IMPORTANT: The baffle prevents ice from over–filling the manual fill area during agitation/dispensing with
a full storage bin and forcing the manual fill cover off.
3. Place the sealing washers (item 10) over the studs and flat washers (item 11) then fasten in place with the
nylon acorn nuts (item 9).
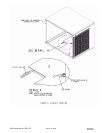
4. Set the lid assembly onto the dispenser. Using the slotted holes on the side of the lid as a template, drill four
(4) 9/64” diameter holes at the bottom of the slots (Figure 2).
Note: Use extreme care not to drill into the hopper. Use a drill stop to ensure that the drill bit does not
penetrate deeper than ¼” past the sheet metal. Failure to do so could result in a hole in the hopper, great-
ly reducing the efficiency of both the dispenser and ice maker.
5. Fasten the lid to the dispenser with four (4) #8 sheet metal screws (item 6), two on each side.
6. Seal the ice maker to the top of the dispenser as follows:
A. Remove the ice maker front panel.
B. Position the ice maker base on the gasket (item 7) located on the lid assembly.
IMPORTANT: Do not slide the ice maker into position on the lid.
C. Lift and set the ice maker base onto the lid to avoid damaging the gasket seal.
7. Install the brackets (item 5) on either the rear corners or on the back of the ice maker, using the brackets as
a template. Use care not to drill into any ice maker components (condenser, tubing, etc.) or into the ice hop-
per. Be sure to overlap the lid assembly with the brackets, installing screws in both the lid assembly and ice
maker.
8. Install the wireform bracket supplied with the bin–stat kit (item 4) through the 5/8” diameter hole in the bottom
of the ice maker, wrapping the eye of the wireform over the stud near the hole in the ice maker and secure
with the 8–32 nut provided (Figure 3). Feed the bin–stat cap tube through the hole to the end of the wireform
bracket and wrap the tube around the end of the bracket several times , insuring that the tube is secure.
Note: The bin–stat must not interfere with the agitator rotation not be in the path of the ice falling from the
ice maker. If so, bend the bracket out of the way.
9. Apply the label (item 8) on the front of the cover.