


2620913501
NOTE: Disregard steps 4, 5, and 6 if the Dispenser has the icemaker adapter lid factory installed.
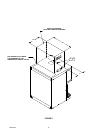
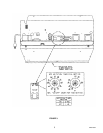
4. Remove the plastic ice storage hopper lid and discard.
5. Place the lid assembly supplied with the kit on top of the Dispenser and position it flush with the back and
sides of the Dispenser as shown in Figure 1.
6. Using the slotted holes in the lid as a template, drill four .136 diameter (#29 drill size) holes at the bottom of
the slots (see Figure 1, detail A) into the Dispenser cabinet. Use care not to drill into the ice storage hop-
per. Fasten the cover to the Dispenser with four #10 sheet metal screws, two on each side.
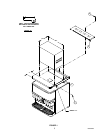
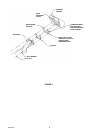
7. Seal the icemaker to the Dispenser lid as follows (see Figure 2):
A. Run a bead of RTV around the opening in the lid and inside the perimeter of the icemaker outline so
that the icemaker will set on the RTV.
B. Set the icemaker onto the lid and position it as shown in Figure 2.
C. Wipe away any excessive RTV.
8. Install the icemaker mounting brackets (item 2) as shown in Figure 2. Using the brackets as a template,
drill .136 diameter (#29 drill size) holes into the icemaker cabinet and the Dispenser lid (item 1). Use care
not to drill into any icemaker components (condenser, tubing, etc.). Secure the brackets using the #10
sheet metal screws provided.
9. Follow the icemaker manufacturer’s instructions to complete the installation of the icemaker including the
bin thermostat.
10. Secure the manual ice fill cover in position on the lid over the rear hopper access opening with the thumb
screw (item 6). Note that the gasket should be compressed to form a seal against the icemaker cabinet
with the cover secured in position.