


EN
3
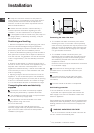
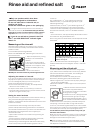
Connecting the water outlet hose
Connect the outlet hose (without bending it) to a drain
duct with a minimum diameter of 4 cm. Alternatively, rest
it over a sink or tub; the free end of the hose should not
remain immersed in water.
The special plastic elbow
*
makes it easier to find the
best layout: fix the elbow to
the wall securely in order
to prevent the outlet hose
from moving and spilling
the dirty water.
The part of the hose
marked with the letter A
should be between 40 and
100 cm above the ground
(see figure).
We advise against the use of hose extensions.
Electrical connection
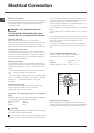
Before inserting the plug into the electrical socket, make
sure that:
The socket is earthed and complies with current
regulations.
The socket can withstand the maximum load of the
appliance, which is indicated on the data plate
located on the inside of the door (see chapter entitled
Description of the appliance).
The power supply voltage falls within the values
indicated on the data plate on the inside of the door.
The socket is compatible with the plug of the
appliance. If this is not the case, ask an authorised
technician to replace the plug (see Assistance); do
not use extension cables or multiple sockets.
Once the appliance has been installed, the power
supply cable and the electrical socket should be easily
accessible.
The cable should not be bent or compressed.
If the power supply cable is damaged, it must be re-
placed by the manufacturer or its Technical Assistance
Service in order to prevent all potential hazards. (See As-
sistance)
The Company shall not be held responsible for any
incidents that occur if these regulations are not
observed.
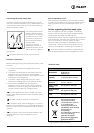
Anti-condensation strip*
After installing the dishwasher, open the door and stick
the adhesive transparent strip under the wooden shelf in
order to protect it from any condensation which may
form.
Advice regarding the first wash cycle
After the appliance has been installed, immediately
before running the first wash cycle, completely fill the
salt dispenser with water and add only then
approximately 1 kg of salt (see chapter entitled Rinse aid
and refined salt). The water may overflow: this is normal
and is not a cause for concern. Select the water
hardness value (see chapter entitled Rinse aid and
refined salt). - After the salt has been poured into the
machine, the LOW SALT indicator light
* switches off.
If the salt container is not filled, the water softener
and the heating element may be damaged as a result.
* Only available in selected models.
Technical data
A
Dimensions
width 59.5 cm
height 82 cm
depth 57 cm
Capacity
12 standard place-settings
Water supply
pressure
0,05 ÷ 1MPa (0.5 ÷ 10 bar)
4.3 psi – 145 psi
Power supply
voltage
See appliance data plate
Total absorbed
power
See appliance data plate
Fuse
See appliance data plate
This dishwasher conforms to
the following European
Community Directives:
-73/23/EEC dated 19/02/73
(Low Voltage) and
subsequent modifications
-89/336/EEC dated 03/05/89
(Electromagnetic
Compatibility)
and subsequent modifications
-97/17/EC (Labelling)
-2002/96/ CE (
Waste
Electrical and Electronic
Equipment WEEE)