


GB
5
Start-up and use
Starting the appliance
! Before starting the appliance, follow the installation
instructions (
see Installation
).
! Before connecting the appliance, clean the
compartments and accessories well with lukewarm water
and bicarbonate.
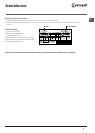
1. Plug the appliance in and make sure the GREEN and
RED indicator lights are illuminated (press the ON/
OFF switch so it is in the - position).
2. Turn the TEMPERATURE ADJUSTMENT knob to the
Super position (YELLOW indicator light illuminated).
3. When the red indicator light switches off, turn the
TEMPERATURE ADJUSTMENT knob to a medium
position. The freezer is now ready to be used.
Using the freezer to its full potential
• Use the TEMPERATURE CONTROL knob to adjust the
temperature.
1 = warmest 4 = coldest
We recommend, however, a medium position.
• Do not re-freeze food that is defrosting or that has
already been defrosted. These foods must be cooked
and eaten (within 24 hours).
• Fresh food that needs to be frozen must not come into
contact with food that has already been defrosted.
Fresh food must be stored in the top FREEZER and
STORAGE compartment.
• Do not place glass bottles which contain liquids, and
which are corked or hermetically sealed in the freezer
because they could break.
• The maximum quantity of food that may be frozen daily is
indicated on the plate containing the technical properties
located within the freezer (for example: Kg/24h: 4).
• To freeze food, turn the TEMPERATURE
ADJUSTMENT knob to the Super position (YELLOW
indicator light illuminated). Place the food you wish to
freeze in the top compartment, making sure it does
not come into contact with any items which are
already frozen. After 24 hours, once the freezing
process is complete, turn the TEMPERATURE
ADJUSTMENT knob to a medium position (YELLOW
indicator light illuminated).
!
Remember to carry out this last step in order.
• Placing large amounts of fresh food in the freezer may
temporarily increase the temperature inside the
appliance (this is indicated when the RED indicator
light illuminates). This situation, as it is only
temporary, does not adversely affect the storage
conditions of food that is already frozen.
! Do not open the door during freezing.
! If there is a power cut or malfunction, do not open the
freezer door. This will help maintain the temperature
inside the freezer, ensuring that foods are conserved for
at least 9 -14 hours.
! RED Indicator Light. When this red light comes on for a
prolonged period of time, it means that the freezer is not
functioning properly and the temperature is rising too
much. (Call your Service Centre)
This warning light might come on for a brief period when:
a) the door is left open for an extended period of time
(when the freezer is being loaded or unloaded).
b) when the TEMPERATURE ADJUSTMENT knob is set
to the Super position (YELLOW indicator light
illuminated).
In these two cases, the fact that the warning light comes
on does not indicate that the freezer is malfunctioning or
there is a defect.
• In order to obtain a greater amount of space in the
freezer compartment, you may remove the bins
(except the lowest bin and the special COOL CARE
ZONE bin, which has an adjustable temperature)
and place the food directly onto the evaporator
plates.
•
To freeze a lower amount of food than that indicated on
the data plate, position the TEMPERATURE
ADJUSTMENT knob to SUPER (yellow indicator light
on) and introduce the foodstuffs into the upper
compartment.
After 24 hours, once the freezing process is complete,
reposition the TEMPERATURE ADJUSTMENT knob to
a medium position (yellow indicator light off).
To freeze the same amount of food as that indicated
on the data plate, position the TEMPERATURE
ADJUSTMENT knob to SUPER (yellow indicator light
on) 24 hours prior to introducing the foodstuffs to be
frozen; introduce the foodstuffs then wait a further 24
hours before re-positioning the knob to the normal
operation position.