


2727
2727
27
F
A
E
K
G
D
B
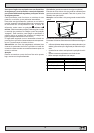
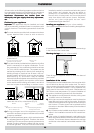
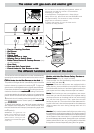
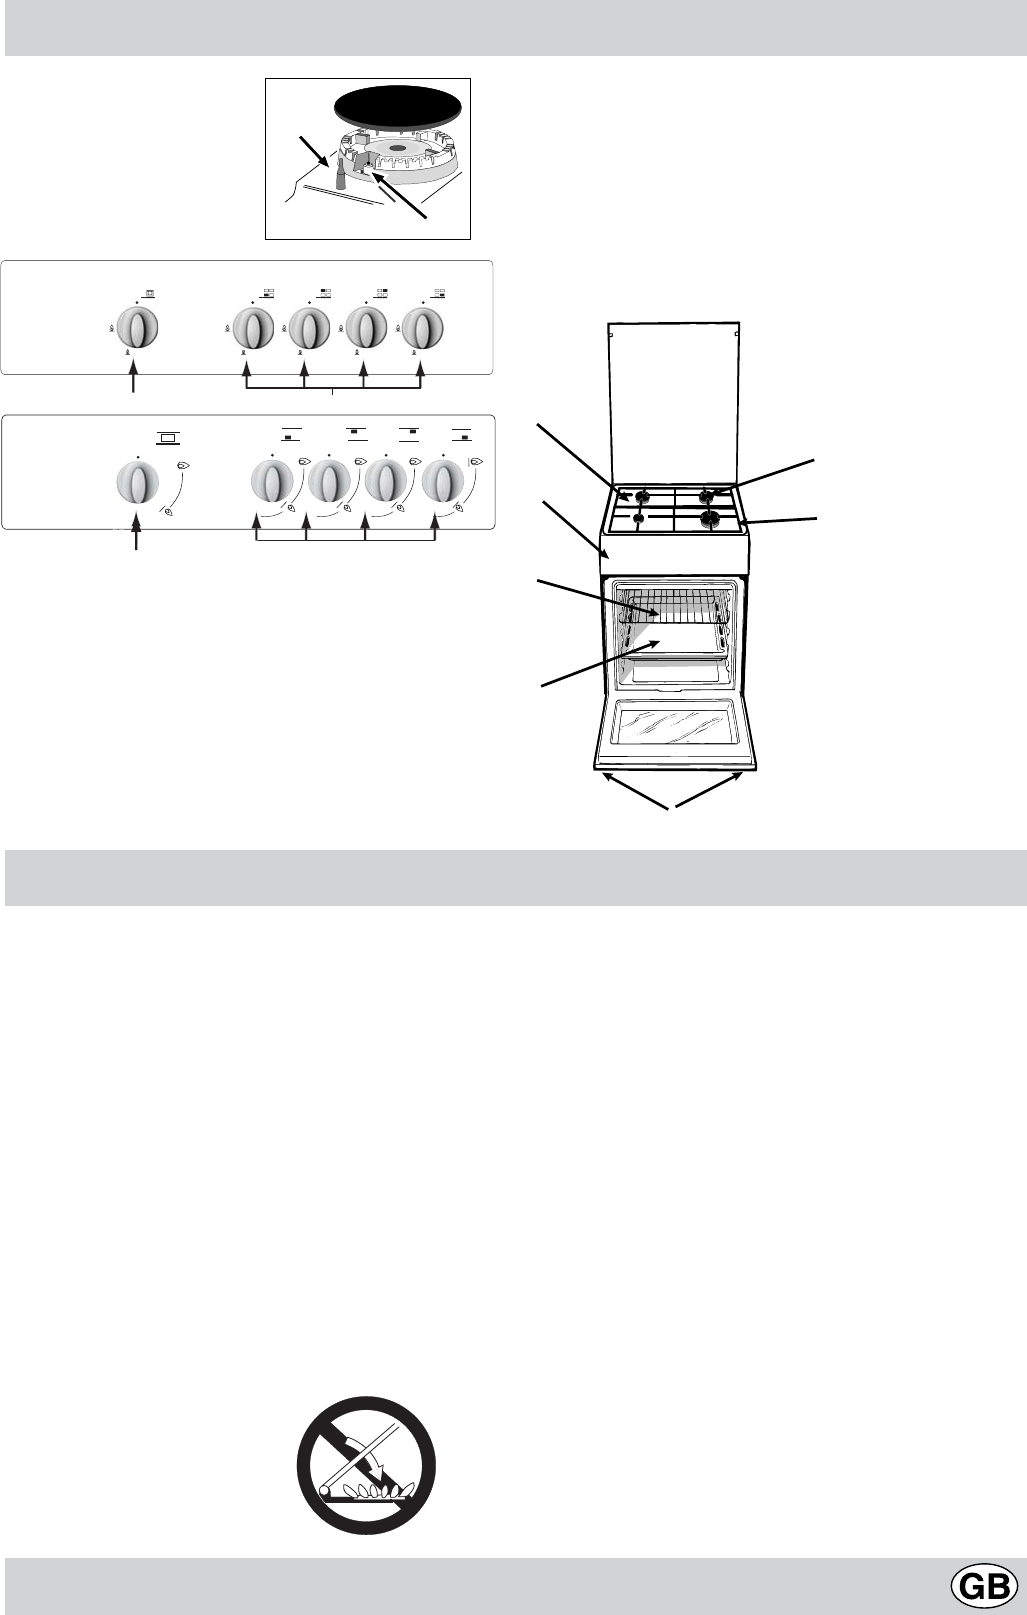
A.
Tray for Catching OverflowsTray for Catching Overflows
Tray for Catching OverflowsTray for Catching Overflows
Tray for Catching Overflows
B.
Gas BurnerGas Burner
Gas BurnerGas Burner
Gas Burner
D.
Top GrateTop Grate
Top GrateTop Grate
Top Grate
E.
Control PanelControl Panel
Control PanelControl Panel
Control Panel
F.
Adjustable Feet or LegsAdjustable Feet or Legs
Adjustable Feet or LegsAdjustable Feet or Legs
Adjustable Feet or Legs
G.
Dripping Pan or Baking SheetDripping Pan or Baking Sheet
Dripping Pan or Baking SheetDripping Pan or Baking Sheet
Dripping Pan or Baking Sheet
J.
Flame Failure Device for Cooktop BurnersFlame Failure Device for Cooktop Burners
Flame Failure Device for Cooktop BurnersFlame Failure Device for Cooktop Burners
Flame Failure Device for Cooktop Burners (only
on a few models)
K.
Oven RackOven Rack
Oven RackOven Rack
Oven Rack
M.
Oven and Grill Control KnobOven and Grill Control Knob
Oven and Grill Control KnobOven and Grill Control Knob
Oven and Grill Control Knob
N.
Control Knobs for Gas Burners on HobControl Knobs for Gas Burners on Hob
Control Knobs for Gas Burners on HobControl Knobs for Gas Burners on Hob
Control Knobs for Gas Burners on Hob
The cooker with gas oven and electric grillThe cooker with gas oven and electric grill
The cooker with gas oven and electric grillThe cooker with gas oven and electric grill
The cooker with gas oven and electric grill
The various functions included in the cooker are selected by
operating the control devices located on the cooker control
panel.
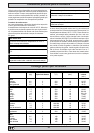
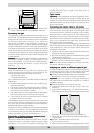
Control Knobs for the Gas Burners on the Hob Control Knobs for the Gas Burners on the Hob
Control Knobs for the Gas Burners on the Hob Control Knobs for the Gas Burners on the Hob
Control Knobs for the Gas Burners on the Hob (N)
The position of the gas burner controlled by each one of the
knobs is shown by a symbol of a solid ring:
•
. To light one
of the burners, hold a lighted match or lighter near the burner.
Press down and turn the corresponding knob in the counter-
clockwise direction to the
maximummaximum
maximummaximum
maximum
EE
EE
E
setting. Each burner
can be operated at its maximum, minimum or intermediate
power. Shown on the knob are the different symbols for off
•
(the knob is on this setting when the symbol lines up with
the reference mark on the control panel), for
maximum maximum
maximum maximum
maximum
EE
EE
E
and
minimum minimum
minimum minimum
minimum
CC
CC
C
..
..
.
To obtain these settings, turn the knob counter-clockwise
with respect to the off position. To turn off the burner, turn
the knob clockwise until it stops (corresponding again with
the
•
symbol).
Models with Hob Gas Burner Safety Devices toModels with Hob Gas Burner Safety Devices to
Models with Hob Gas Burner Safety Devices toModels with Hob Gas Burner Safety Devices to
Models with Hob Gas Burner Safety Devices to
Prevent Leaks Prevent Leaks
Prevent Leaks Prevent Leaks
Prevent Leaks (only on certain models)
These models can be identified by the presence of the
device itself (see detail
JJ
JJ
J).
Important:Important:
Important:Important:
Important: Since the hob burners are equipped with a
safety device, you must hold the control knob in for about
6 seconds after the burner has been lighted to allow the
gas to pass until the safety thermocouple has heated.
Notice: Notice:
Notice: Notice:
Notice: The first time you use your appliance, we recom-
mend that you set the thermostat to the highest setting
and leave the oven on for about half an hour with nothing
in it, with the oven door shut. Then, open the oven door
and let the room air. The odour that is often detected dur-
ing this initial use is due to the evaporation of substances
used to protect the oven during storage and until it is
installed.
Attention:Attention:
Attention:Attention:
Attention: Only use the bottom shelf of the oven when using
the rotisserie to cook (where present). For all other types of
cooking, never use the bottom shelf and never place anything
on the bottom of the oven when it is in operation because
this could damage the enamel. Always place your cookware
(dishes, aluminium foil, etc. etc.) on the grate provided with
the appliance inserted especially along the oven guides.
The different functions and uses of the ovenThe different functions and uses of the oven
The different functions and uses of the ovenThe different functions and uses of the oven
The different functions and uses of the oven
WARNING! The glass lid can
break in if it is heated up. Turn off
all the burners and the electric
plates before closing the lid.
*Applies to the models with glass
cover only.
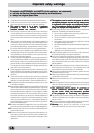
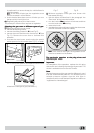
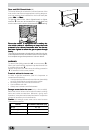
N
M
N
M
X
C
! If the flame is accidentally extinguished, switch off
the burner and wait for at least 1 minute before
attempting to relight it.
If the appliance is equipped with a flame failure
safety device*(X), press and hold the BURNER knob
for approximately 2-3 seconds to keep the flame
alight and to activate the device.
To switch the burner off, turn the knob until it
reaches the stop position*