


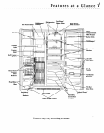
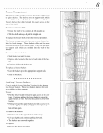
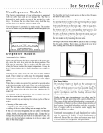

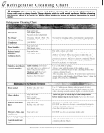

Nondispenser Models
The freezer compartment of your refrigerator is equipped
with ice cube trays and an ice storage bin. The bin is
designed to stack neatly on top of the stacked ice cube
trays. To release the ice cubes from a tray, hold the tray
upside down over the bin and twist both ends.
Your refrigerator is automatic ice maker ready. The number
for the ice maker kit you need appears on the data plate (see
page 1).
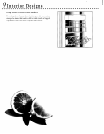
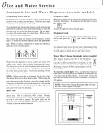
Dispenser Models
Automatic Ice Maker
After your refrigerator has been connected to the water sup-
ply, move the wire lever arm into the down position. This
will start its operation. The ice maker will fill with water
when the freezer reaches the proper temperature. It may be
8 to 12 hours before the ice maker furnishes any usable ice
cubes.
Discard all the cubes from the first two or three batches
made. These initial ice cubes may be irregularly shaped,
discolored, or contain impurities from the new water supply
piping.
When the ice cubes are ejected it is normal for several cubes
to be joined together at the ends. They can easily be broken
apart. The ice maker will continue to make ice until the sup-
ply of ice cubes raises the wire lever arm, shutting the ice
maker off.
To manually stop the operation of the ice maker, move the
wire lever arm into the up position.
Certain sounds may accompany the various cycles of the ice
maker.
l
buzzing of the water valve
l
running of the water as the tray tills
l
rattling of the ice cubes falling into an empty ice bin.
If the ice is not used frequently, the ice cubes will become
cloudy, shrink, stick together and taste stale. Empty the ice
storage bin periodically and wash it in lukewarm water. Be
sure to dry the bin before replacing it or the ice cubes will
stick to the metal auger.
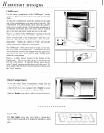
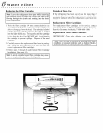
To check the ice level or gain access to the ice bin, lift open
the door on the ice bin.
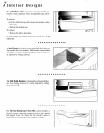
To remove the bin, first turn off the ice maker. This is done
by opening the door on the ice bin and moving the ice maker
wire lever up to the “off’ position. Then reach under the bin
front and pull down on the back edge. After it snaps free,
pull the bin straight forward. To replace the ice bin, align
the bottom rails to the corresponding shelf grooves and
push it straight back until it stops and latches. Make sure
the tabs, at the back of the bin, that turn the spiral auger are
positioned between the prongs from the auger motor. Turn
the ice maker on by lowering the wire arm.
Beverages and foods should not be placed in the ice storage
bin for quick chilling. These items can block the wire lever
arm, causing the ice maker to malfunction.
For Your Safety
Do
not place fingers or hands on the automatic ice
making mechanism while the refrigerator is plugged
in. This will help protect you from possible injury. It
will also prevent interference with moving parts of the
ejector mechanism and the heating element that
releases the cubes.
Under certain rare circumstances, ice cubes may be
discolored, usually appearing with a green-bluish hue.
The cause of this unusual discoloration is apparently a
combination of factors such as certain characteristics of
local waters, household plumbing and the accumula-
tion of copper salts in an inactive water supply line
which feeds the ice maker.
Continued consumption of such discolored ice cubes
may be injurious to health. If such discoloration is
observed, discard the ice cubes and contact your deal-
er from whom the refrigerator was purchased.