


19
7. If Timer is chosen, enter the cook timer length using the
on-screen number keyboard and touch NEXT.
8. The Probe can be used only with Bake, Convect Bake and
Convect Roast. If Probe is chosen, select the probe target
internal temperature. Use the -5ºF (-1ºC) or +5ºF (+1ºC)
buttons to decrease or increase the set temperature, then
touch NEXT.
9. Touch ADD STAGE to enter new stage information.
10. Review your settings. Touch EDIT to re-enter the settings or
touch DELETE to immediately delete the stage.
11. Touch SAVE or SAVE & START.
When saving, you can enter a name for the food using an
on-screen keyboard. Press a keyboard key repeatedly to
cycle through its letters. For example, press “ABC” once to
enter “a,” twice to enter “b” and three times to enter “c.” After
2 seconds, the letter is accepted, and cursor moves to the
next position. A name cannot exceed 40 characters,
including spaces. Touch DELETE to delete the last character
in the text box.
12. Touch OK.
13. NOTE: If you would like to edit after saving the settings, enter
into My Creations from the Home Tab. Select the setting
name you would like to edit and touch EDIT at the bottom of
screen. Select EDIT for the steps you want to edit then enter
new settings.
Bake
During baking, the appropriate heating elements and fan(s) will
cycle on and off in intervals to maintain the oven temperature.
Bake is used to cook up to 2 racks of food. For best results, allow
the oven to preheat prior to placing food in the oven.
If the oven door is opened during baking, the heating elements
will turn off approximately 30 seconds after the door is opened.
They will turn on again approximately 30 seconds after the door
is closed.
Before Using Bake:
Before using Bake, see the “Positioning Racks and Bakeware”
section and the following tips for rack positions.
Rack positions
1-rack baking: 3
2-rack baking: 2 and 4
For meat and poultry: 2
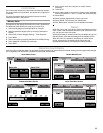
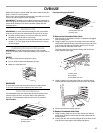
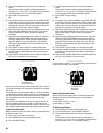
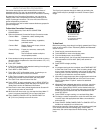
For best results when baking cakes on 2 racks, use racks 4 and 2
for baking. Place the cakes on the racks as shown.
To Use Bake:
1. Touch MODES to move to the Modes menu.
2. From the Modes menu, touch BAKE.
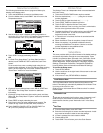
3. After touching Bake, you will move to the Temperature
screen, or you may touch the Temperature tab to move to the
Temperature screen.
Use the slider to enter a desired cooking temperature or
touch the -5°F (-1°C) or +5°F (+1°C) buttons. The temperature
must be between 170°F (77°C) and 550°F (288°C).
4. Touch START to begin preheating oven.
OR
5. If a programmed cook time is desired, touch TIMER NOT SET
to enter the Cook Timer screen. Enter a cooking length using
the on-screen number keyboard to set a timer to alert when
cooking ends. The cook time may not exceed 12:00:00. The
oven will turn off when the cook time expires.
6. (Optional) To keep food warm after a programmed cook timer
ends, press KEEP WARM ON from the Cook Timer screen.
See the “Keep Warm™ Option” section for additional
information.
7. (Optional) To set a delayed start with a cook time, touch the
TIMER NOT SET/COOK TIMER screen and enter desired
cook time. Select DELAY START, set the desired start time
and touch SET DELAY. To set only a delay start, touch DELAY
START from the temperature tab, set the desired time and
touch SET DELAY.
8. Touch START to begin cooking or to activate Delay Start.
9. To change a mode, temperature or cook time while the oven
is active, touch the appropriate tab. Make a new selection
and touch OK.
10. Press CANCEL OVEN (CANCEL LEFT or CANCEL RIGHT on
48" [121.9 cm] models) to turn off the oven.
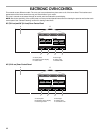
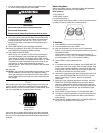
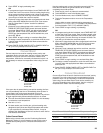
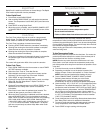
A. Broil elements
B. Bake element
WARNING
Burn Hazard
Use an oven mitt to remove temperature probe.
Do not touch broil element.
Failure to follow these instructions can result in burns.
A
B