


11
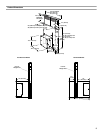
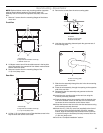
Rear Mounting - Blower Motor
NOTE: Optional blower motor rear mounting position (opposite
side) for island cabinet locations. The blower motor box
assembly can be moved to the opposite side (rear) of the vent
box.
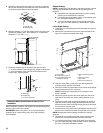
1. Remove 7 screws from the mounting flanges of the blower
motor box.
Front View
2. Lift blower motor box off the shoulder screws in the keyhole
slots. Disconnect wire connection from blower motor and set
blower motor box aside.
3. Remove 6 screws from the mounting flange of the
¼" (6.4 mm) deep cover.
Rear View
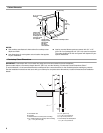
4. Lift the ¼" (6.4 mm) deep cover off the shoulder screws in the
keyhole slots and set the cover aside.
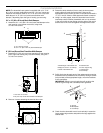
5. Remove the screws from the wire mounting plate.
6. Hold the wire mounting plate and push the grommet out of
the mounting plate.
7. Slide the wire assembly through the slot in the wire mounting
plate to remove it.
8. Place the wire assembly through the opening to the opposite
side of the vent box.
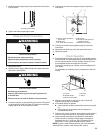
9. Reassemble the wire assembly and grommet to the wire
mounting plate.
10. Install the wire mounting plate to the vent box using the
4 screws previously removed.
11. Place the blower motor box assembly with the keyhole slots
over the 2 shoulder screws on the rear of the vent box and
reconnect the wire connection to the blower motor.
12. Mount the blower motor box to the vent box and secure using
the 6 screws previously removed.
13. Mount the 4³⁄₄" (12.0 cm) cover box (supplied) to the front of
the vent box. Place the keyhole slots over the 2 shoulder
screws, align the mounting holes, and secure the cover box
to vent box using the 6 screws previously removed from the
¼" (6.4 mm) deep cover.
14. Go to the “Complete Installation” section.
A. Screws (7)
B. Keyhole slot shoulder screws (2)
C. Blower motor box
A.Screws (6)
B. Keyhole slot shoulder screws (2)
C. ¼" (6.4 mm) deep cover
B
A
C
A
A
B
A
C
A. Screws
B. Wire mounting plate
C. Blower motor box
A. Wire mounting plate
B. Grommet
A
A
B
C
A
B