


REPAIR GUIDE
CUPPING
Butcher block can cup when it is in an unsealed and/or unbalanced state. Cupping is natural
and occurs when there is an absorption or loss of atmospheric moisture on one side of the
board and not the other, causing a moisture content imbalance. This imbalance is a
temporary situation and is caused when there are changes in humidity or atmospheric
conditions. Proper sealing prevents an imbalance occurring.
NATURAL WOOD BLEMISHES
Any grain checking, tear-out and similar wood blemishes can be filled with a matching wood
p
utty and then sanded smooth. Shakes and similar blemishes, which have a tendency to lift,
can be glued down, using a five minute Epoxy glue mixed with matching color sanding dust.
Alternatively, to make a blemish appear natural, apply “Plasticbond” colored with a very
small amount of oxide of suitable color. Sand smooth when it has set. If filling as above is
impractical because of aesthetics, a portion of the laminate can be removed with a router and
replaced with a fillet (a strip of similar timber ripped to the matching width and thickness)
glued in place with a full strength Epoxy glue, and then sanded.
SPLITS and SHAKES
Minor shakes and splits in wide slabs of butcher block are rare, but normal. They are usually
caused by contraction of the top after installation as the bench top “normalizes” to the
humidity of the site environment. They can be easily repaired at any time using the
following method.
REPAIRING A SPLIT
1. Using a utility knife, remove any debris from the split.
2. Spray a light mist of Custom Bond Accelerator over/and into the slit. Allow to
dry. This will help prepare the area for the Instant Adhesive.
3. Hairline splits can be filled with Instant Adhesive alone. Splits a 1/32
nd
or wider
will require gluing-in wood wedges.
4. Apply a small bead of Instant Adhesive to both sides of the chisel end of a wood
wedge. Apply a small bead of Instant Adhesive over the split.
5. Lightly tap wedge into split.
6. Spray glue line on both sides of wedge with Accelerator to cure glue line. You
will see the glue craze or flash over in a few seconds. Glue should now be rock
hard. If not, mist glue line again with Accelerator.
7. Using a sharp utility knife, score both sides of wood wedge just above the table
surface. Keep scoring each side until wedge is cut off.
8. Sand glue line flush, starting with a piece of 100 grit sandpaper wrapped around
the sanding block. Sand with the grain. When sanding, feather out the area
around the repair so it blends in with the surrounding area so as not to create a
“dip” or “depression” over the repair.
9. Finally, sand and blend with 150 grit sandpaper wrapped over the sanding block.
10. Remove excess sawdust from repaired area.
11. Wipe repaired area with tack cloth.
12. Follow directions on the EZ-DO can and finish repaired area.
REPAIRING A WINDSHAKE
1. Using a utility knife, scrape any debris away from the windshake.
2. Spray a light mist of Accelerator over and into the windshake. Allow to dry. This will
help prepare the area for the Instant Adhesive.
3. Carefully slide edge of utility knife under edge of windshake and gently lift up. Take care
not to break off the windshake.
4. Squirt a small bead of Instant Adhesive into and over the windshake.
5. Using a wood wedge, apply pressure to the top of the windshake to “clamp” it down.
6. While still applying pressure (clamping) to the windshake, mist the glue with Accelerator to
quick cure the glue.
7 .Follow steps 8 thru 12 from above section
”Repairing a Split”.
MINOR DENTS
A small dent can be easily fixed by recovering the crushed wood cells with an application of
steam. To achieve this, place a very damp rag over the dent and sit a hot iron on the damp
rag. Allow the wet heat to penetrate the wood. The time for it to recover will vary according
to the severity of the dent and the density of the wood. Check on progress after a minute or
two, and if necessary, repeat. Finish with a light sand, particularly if the wood fibers have
been broken or damaged. This process can also be done over a finish, but takes longer.
FABRICATION OF TOPS
Whatever John Boos item is being made, the sequence of construction and finishing processes
remain the same. Remember, wood works easily, and common sense and care are your bes
t
tools. In general this is what you will need to do.
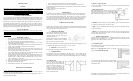
1. SHOOTING THE EDGE
Edges need to be dressed true (shot), as they will
not necessarily be straight enough for follow
operations (joining for width, corner joints,
splashbacks, aprons, etc.)
Shooting can be achieved on a jointer or spindle,
but if neither are available, a router and straight
edge can be used (see drawing at right).
Run the router anti-clockwise against the straight edge; this helps prevent chipping out. Don’
t
try and cut the full depth off in one pass: take 1/8” to 3/16” at a time.
2. JOINING to make a wider board
i) Shoot straight the two edges which go together (see section 1).
3. CORNER JOINTS
Recommended corner joints are MITERS or full BUTT joints. Mason’s miters are no
t
recommended. For miter joints on boards of unequal width, (see fig. 7.2) a true miter normally
gives the best result as any movement is equalized, and the laminates will be close to matching.
i) Cutting the joint.
Cut on a panel saw; if unavailable use the
router and straight edge method (see
diagram at right). Cut one board from the
top and its mate from the bottom. This
ensures any slight discrepancies are
averaged. For out of square corners, make
a template of the corner and increase the
width of one bench top leg, and then rip it
back to match the template.
ii) Biscuit or tongue the joint.
All corner joints should be “Lamella” biscuits or plywood slip tongues fitted (see Section
2). Do not use dowels.
iii) Bolt clamp the joint.
Bolt clamp (miter bolts) (see diagram at right) should be
fitted to the underside of all joints. 4” from the front, 6”
from the back of miters and 1-1/2” in from both sides of
Butt Joints with bolt clamps spaced on 9” to 12” centers.
iv) Machine and insert “Lamella” type joining biscuits or groove with a router and inser
t
7/32” thick plywood slip tongues, each about 4” long.
v) Apply a Type II woodworkers glue to both edges, as well as the joining biscuits/slip
tongues and insert them.
vi) Bring the two boards together and clamp in place with bar or pipe clamps spaced
about 18” apart. Bolt clamps (see section 7.3) can be used, but be careful that boards
remain in the same plane (ie: flat).
4. RIPPING THE WIDTH
Rip all boards to the required width. In calculating the finished width allow for the
thickness of aprons, splashbacks, etc. Also, check if there are any out of square corners
that require extra width for trimming (see Section
7.)
vii) Assemble the joint.
Dry assemble the joint, check level and fit and adjust, if necessary. Sand the top to even
out any variation in thickness.
Butt joints with opposing grain direction (see diagram at
right) are
NEVER TO BE GLUED.
For a butt joint where the grain runs in the same direction
(see diagram at right); this is the same as widening a board
and should be glued.
Miter joints can now be glued unless they are to be left “open” to facilitate transport, access
and handling. Open miter joints should be glued on site.