9
Proceed as follows:
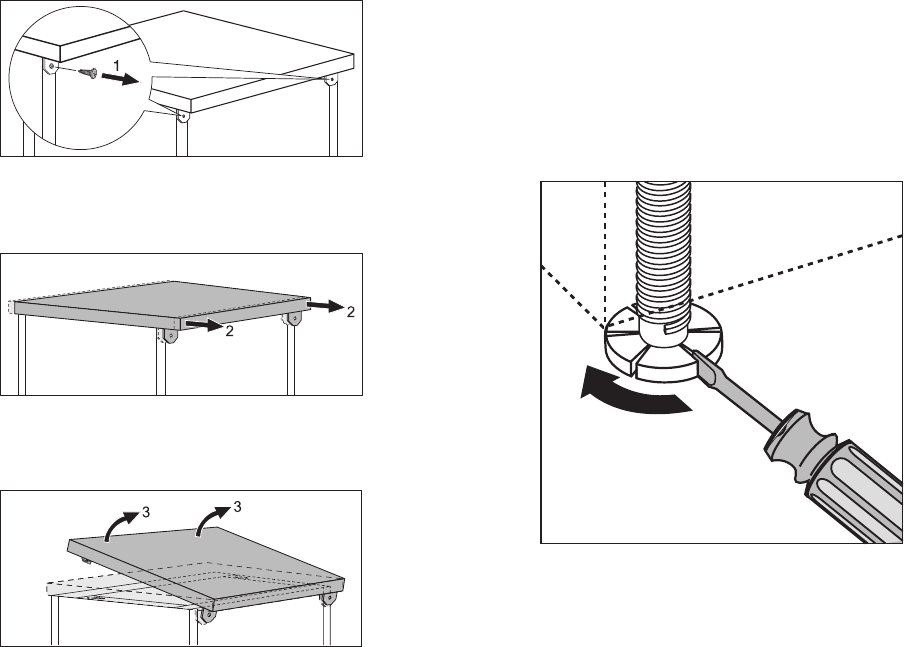
1.Unscrew the screws from the elbows at the rear (1).
2.Push the appliance’s worktop backwards about 1 cm (2).
3.Lift the worktop at the front (3) and remove it.
Insert the machine after adjusting
height and levelling with the adjustable feet. When inserting
the machine, ensure that the water inlet and drain hoses are
not kinked or squashed. During all operations that involve
accessibility to internal components the dishwasher has to
be unplugged.
1 Be sure that once the appliance has been installed, it
is easily accessible for the service engineer in the
event that a repair is required.
1 If the dishwasher is installed directly next to a cook-
er, a heat-insulating, non-flammable panel (laminated
with aluminium foil on the side next to the cooker)
must be fitted flush with the top edge of the work
surface.
1 If the dishwasher is later used as a free-standing ap-
pliance, the work surface supplied with it must be re-
mounted.
3 The plinth on free-standing appliances is not adjusta-
ble.
Levelling the Dishwasher
• The dishwasher must be installed on a firm floor and ad-
justed to ensure that it is stable and level in all directions.
• To overcome irregularities in the floor and to match the
height of the appliance to that of surrounding units, ex-
tend the threaded feet using a screwdriver.
• The drain hose, inlet hose and mains cable must be laid so
that they are able to move freely within the plinth area,
and so that they are not kinked or crushed when the dish-
washer is in position.
Good levelling is essential for correct closure and sealing of
the door.
When the appliance is correctly levelled, the door will not
catch on either side of the cabinet.
If the door does not close correctly, loosen or tighten the
adjustable feet until the machine is perfectly level.


