


EXTRA BAKE- You can manually adjust the amount of time for any baking by using the
plus and minus buttons to change the time in 10 minute increments. This must be done
at the beginning, before the programmed baking begins.
FAST RAKE - The Fast Bake cycle goes through kneading, rising and baking in
approximately an hour. Mix-ins must be added at the very beginning of the cycle
with other basic ingredients. This cycle comes in handy when you cannot plan ahead
for bread making, The kneading and rising of this cycle is suitable for white bread
_ecipes. Bring all ingredients to room temp and liquids to 100 °F. The texture and rise
of the bread is greatly improved by adding vital wheat gluten to the mixture- in a pinch
it can be left out, but keep it on hand for Fast Bake Loaves.
KEEP WARM FUNCTION - After the bread has baked, the Bread Maker will go into a
Keep Warm mode to keep the bread warm and to ensure that the crust does not
become too soft. Also, items baked using the Fast Bake setting benefit from this step,
This function lasts for up to 60 minutes.
BEFORE FIRST USE:
Before using your Bread Maker, remove any packing material, plastic, labels, stickers or
fags that may be attached to the appliance, Clean the appliance thoroughly:
1, Wash the bread pan, kneading blade, measuring cup and measuring spoon in hot.
soapy water.
2. Rinse and drythoreughly,
3. Do not use a dishwasher to clean bread pan. Dishwashing can damage the non-stick
properties of the bread pan, allowing bread to stick during baking.
3, DO NOT IMMERSE BREAD MAKER INWATER.
4, The exterier or the Bread Maker can be cleaned with a soft damp cloth and warm
soapy water. Dry thoroughly. Do not use abrasive materials or cleaners.
5, The Oven Chamber can be cleaned with a damp cloth and dried thoroughly: Only clean
oven chamber when it is cool,
Place Bread Maker on a dry, flat, level surface such as a countertop eltable. Leave plenty
of room around unit for air circulation. Make sure you have enough room above unit to
open the lid,
1.
2.
3,
4.
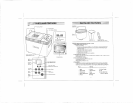
Lift outthe bread pan by pulling
up on its handle.
Fit the kneading blade (see Fig. 4)
onto the drive shaft in the bottom
of the bread pan.
Pour the water, or other liquid called for
as the first item in the recipe, into the
bread pan.
Unless otherwise instructed, add tile other
ingredients at room temperature to the pan
in the order listed in the recipe. 'feast should
always go in last. Make a small indentation
with your finger in the top of the dry ingredients
and add the yeast to the indentation, Do not let
the yeast touch the liquid below.
Make sure all ingredients are measured and weighed accurately. Use the see-through
measuring cup included for liquids, and measure at eye level For dry ingredients, use
a measuring cup that can be leveled off with the straight edge of e knife or metal spatula.
A measuring spoon is also included, for tablespoon or teaspoon measures. Level off dry
ingredients. Inaccurate measurements will produce poor resugs.
Insert the bread pen into the oven chamber and push down firmly uniil it fits into the
drive couptlng in the bottom of oven chamber, and clicks into the two clips on each
side of bread pan handle. If pan is not inserted correctly, the kneading blade cannot
work properly.
Lower the bread pan handle and close the Lid. Plug in and switch On. The unit will beep
and the program default setting of I w II d splay, hen the cook t me for Program !,
3:!5 (3 hrs. 15 mira),
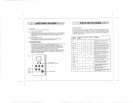
Press the Menu Sutton until you see the program number you want in the LCD Display
Window. Refer to Ihe chad on top of the Lid for program numbers. Ifyou miss the
program number you wanted, just keep going through el! of them again until you come
back to it. DO NOT use the plus and minus buttons. They are on(y for time delay setlings
and extra bake times. NOTE: If using the Fast Bake setting, just press the button and the
program will start automatically.
g. Select tile loaf size you are going to make by pressing the Loaf Size Button until the
indicator in the LCD Display Window points to your choice. The default setting is 1 Lb.
Keep pressing the button until indicator is pointing to your desired setting.