


Leveling the Freezer
To ensure proper door seal and optimum performance,
level freezer using the leveling leg located on its bottom
front corner.
Once your freezer is in the desired location, use a
carpenter's level and adjust the leveling leg as
necessary to make sure the cabinet is level side-to-
side.
• Adjust the leg to achieve a !/4 inch slope from
front-to-back (1/2 bubble on a carpenter's level) to
provide easy door closure and proper door seal.
• If the rear corners need to be raised, use shims
made of wood or other hard material. Cardboard
and other soft materials will not work.
Electrical Requirements
• 120 Volts, 60 Hz (60 cycles AC), 15 amps
• DO NOT use an extension cord.
• select an electric wall outlet that cannot be turned
off by a switch or pull chain. Be sure that the elec-
tric outlet you select does not need a ceiling drop
cord.
• Use a fuse or circuit-breaker protected circuit that
will not become overloaded when the freezer is
installed.
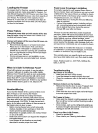
Electrical Grounding
Your freezer comes with a three-prong plug and must
be inserted into a three-prong, grounded wall outlet.
3-pronggrounding
type watl receptacle _
gmunmng p ug
_ ARNING: Unless the grounding method
described above is followed, you are not
protected against severe or lethal shock in
the event of the short circuit of the freezer's
wiring or electrical components.
Operation
Starting
The freezer temperature is preset to maintain the
ideal temperature for food storage. The evaporator
forms the storage shelves of the unit which provides
consistent freezing temperatures throughout the freezer.
Freezer temperature will vary depending on the quan-
tity of food stored and on the frequency of door open-
ings.
Wait 4 hours before loading the freezer. It takes time to
reach .storage temperalu[e. During this time the freezer
may run constantly.-
Maintenance
Defrosting
_ DANGER: Electrical Shock Hazard. Discon-
nect power before defrosting.
You should defrost your freezer when the frost be-
comes 1/4 inch thick. Further accumulation will reduce
operating efficiency. How often you have to defrost
depends on the type and amount of food you freeze,
the temperature and humidity and the number of times
you open and close the freezer. The period between
defrosting can be extended by scraping frost avery so
often with a plastic scraper.
Defrosting Steps
1. Unplug power supply cord.
2. Remove all food and place it in cardboard boxes or
wrap it in several layers of newspaper. This action
will allow food to remain safely frozen while you
defrost and clean your freezer.
3. Leave door open and wait for frost to soften. Place
pans of hot water on the shelves or use an electric
fan blowing, into the freezer to speed defrosting. DO
not use electric defrost devices as they can damage
the plastic parts of your freezer.
4. Remove softened frost with a plastic or wooden
scraper, or a cloth or sponge. CAUTION: NEVER
USE SHARP OBJECTS TO REMOVE FROST. They
could puncture freezing coils and severely damage
the refrigeration system.
5. Defrost water will accumulate at the bottom of the
interior cabinet which can be absorbed with a
sponge or towel.
6. Clean the inside of the freezer. Cleaning instruct-
ions are described below and on the permanent
use and care label on the inside of the freezer door.
7. Plug freezer in and replace frozen foods..
Cleaning
• Use only mild soapy water to clean door gaskets.
• Turn off the freezer and remove foods. Wash interior
liner with a solution of warm water and two table-
spoons baking soda per one quart of water. Rinse
and wipe clean. DO NOT use soaps, detergents,
scouring powder, spray cleaner or the like for the
liner. They may create unwanted odors in the freezer.
• Wash the exterior with detergent or soap and water.
Rinse well and wipe dry.
• DO NOT use scouring powders or pads. Never use
acids, chemical thinner, gasoline, benzene, or the
like for cleaning any part of the freezer. Boiling water
and benzene may deform .and damage plastic parts."