


9
FILTER CARTRIDGE / USEFUL LIFE / REPLACEMENT
FILTER CARTRIDGE LIFE
Several variables determine how long a cartridge will
last. These include:
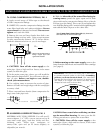
1. where the water filter is installed (filtering all house
water, or just to 1 faucet)
2. how much water you use
3. how much sediment, taste and/or odor, or other unĆ
wanted substance, is in the water
Use the following information as a guide. However,
no matter which type of cartridge you are using, you
will know it is time to replace it when you first noĆ
tice the return of the unwanted substance in your
water.
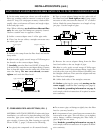
Sediment Cartridges: Cartridge life, when filtering
water to 1 faucet, is about 6 months maximum. CarĆ
tridge life is less when filtering all house water. This
time varies depending on the type of sediment carĆ
tridge.
Filtering sediments, you will know it's time to replace
the cartridge when water pressure drops to the single
faucet, or to the entire house supply.
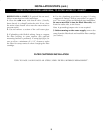
Taste and Odor Cartridges: Filtering water to a
single faucet, the filter cartridge may last for 6 months
or more. Cartridge life is less when filtering all house
water. If the cartridge is also for lead or chemical conĆ
taminant removal, it is more important to replace it freĆ
quently.
Phosphate Cartridge: The cartridge is filled with
pure food grade phosphate crystals. The crystals slowĆ
ly dissolve, and the phosphates coat the insides of the
plumbing. This coating keeps the slightly acid or corĆ
rosive water away from the inside surfaces to help
stop rusting, staining and scale.
In addition to the previously mentioned variables, waĆ
ter temperature, hardness and pH are all factors in
how fast the crystals dissolve. After 4 or 5 months,
check the cartridge to see how many crystals remain.
Replace the cartridge, or refill with crystals if needed
(see page 11). Otherwise, check the cartridge again afĆ
ter several more months. After checking a few times,
you will know about how fast the crystals are disĆ
solved, and the frequency replacement of the carĆ
tridge or crystals is needed.
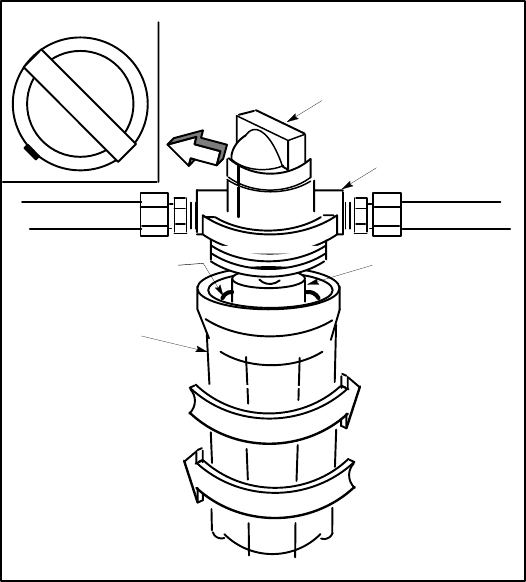
FILTER CARTRIDGE REPLACEMENT
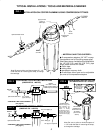
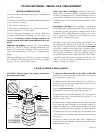
CAUTION: Never remove the sump with water
pressure in the filter.
TURN
SUMP
CLOCKWISE
TO REMOVE
TURN
SUMP
COUNTER-
CLOCKWISE
TO TIGHTEN
sump
head
OFF
ON
BYPASS
OFF
ON
BYPASS
cartridge
o–ring
seal
handle
TOP VIEW
1. Turn the filter handle to the OFF or BYPASS
position, to relieve pressure in the filter. It is normal
for some water to leak out.
2. Turn the sump off of the filter head, to the left or
clockwise. Be careful, the sump is full of water. Do not
lose the large o-ring seal.
Note: A special wrench is available from Sears for reĆ
moving the sump. See the parts list on page 11.
3. Be sure the inside of the sump is clean. Cleaners are
available from Sears (see the parts list on page 11), or
use hot, soapy water.
4. Remove the wrapper from the new filter cartridge
and insert the filter cartridge in the sump. Some carĆ
tridges fit either way, while others fit only one way.
Observe markings on the cartridge, or on the wrapper.
5. Lightly lubricate the o-ring seal, in the sump, with
silicone grease or Vaseline. Be sure it is fully seated in
the groove.
6. Hold the sump up to the filter head, aligning the
center hole in the cartridge with the protrusion on the
bottom of the head.
continued