


Setting Cookfop Controls
Preheat Recommendations
When preheating a pan on the cooktop always watch
carefully. Whenever using the cooktop, always pay attention
to any items cooking and remain attentive until the cooking
process is complete.
Keep in mind that induction may decrease the amount of
time required to preheat a cooking utensil.
Keep Warm Feature
The Warm feature may be used with any of the Cooking Zones.
To Turn the Keep Warm Feature ON:
1. Select the zone you want to set to warm. If the zone is
off turn it on, otherwise you can touch either the A or
V key on the zone you want to set to warm. The most
recently used zone is one that will be placed into warm.
Warm
2. Touch the & Hold key pad located in the main control
area. The Cooking Zone Alpha-Numeric display will show
L (Low heat) indicating that the Cooking Zone is properly
set to Keep Warm.
Minute Timer Feature
The Minute Timer feature may be useful in the kitchen if
a recipe calls for keeping track of time. This feature will
keep track of time from 1 to 99 minutes. The Alpha-Numeric
display located to the left of the Timer UP/DOWN arrow
key pads will begin to count down minutes once set.
To Set the Minute Timer:
1. Set the cooktop timer to the desired time by touching
the A listed under the word "TIMER". Touching and
releasing the A or the V key pads will increase or
decrease the Minute Timer setting by 1 minute with each
key press (up to 99 minutes). You may also hold the A or
V key to slew the time to your designated time.
2. Once the Timer Alpha-Numeric displays the desired
amount of time, release the A or V Arrow key pads.
The timer wiil display the time remaining in minutes within
the countdown process. During the last 60 seconds, the
timer will countdown in seconds.
Note: After the timer is set, it is normal for the displayed
value to automatically go down by one minute. This is
due to the fact that the display only shows the minutes
remaining and does not show the countdown process in
the back ground. For example when setting the timer for
3 minutes, the timer will start counting down at 02 min 59
seconds, but the timer display wiJJ only show 02 minutes,
not the remaining seconds.
Once the Minute Timer reaches uunr_a long beep wiil sound
every 5 seconds until A and V key pads are touched at
the same time and the timer Alpha-Numeric display will
flash ,,nr_,
uu indicating that the time is up.
To Cancel the Minute Timer:
1. Touch the A and V key pads at the same time or touch
and hold either the A or V key pad and scroll to nnUU.
2. If cancelling the Minute Timer using the scrolling method,
once the Main Control Alpha-Numeric display reaches nn
ULJ l
release the Arrow key pad.
3. The set time will disappear from the LED indicating that
the Minute Timer is no longer active.
Locking the Controls Feature
The Induction Cooktop may be locked in order to prevent
the cooktop from accidentally being turned ON.
To Turn ON the Controls Lock Feature:
1. The Cooktop Loci< will not activate until the cooktop is OFF.
POWER
If the cooktop power is not OFF, touch and hold the On/Off
key pad until a beep sounds (about 1 second). The Power
POWER
LED located above the On/Off key pad will turn OFF.
2. Touch the _ key pad until a beep sounds (about 3
seconds). The Loci< LED above the _ key pad will turn
ON indicating the cooktop is locked. This wiii keep
any Cooking Zone or Cooktop functions from being
accidentally turned ON.
To Turn OFF the Controls Lack Feature:
1. Touch the _ key pad until a beep sounds (about 3 seconds).
The Lock LED above the _1 key pad will turn OFF indicating
the cooktop is unlocked. The Cooking Zones or any of the
other Cooktop functions may now be used.
2. If the cooktop is needed you must touch and hold the
POWE R
On/Off key pad until a beep sounds (about 1 second). The
POWER
Power LED located above the on/off key pad wiJJ turn
ON. You may now activate any of the Cooking Zones.
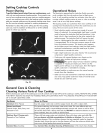
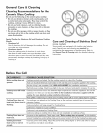
Power Sharing
In order to give you more flexibility, your induction cooktop
is equipped with more cooking zones than the number of
induction generators. Each of those generators is assigned to
power a specific cooking zone (Fig. 23). One or two cooking
zones are assigned to each generator. To be able to give you
access to the highest power ratings, the generator will focus
its power onto only one cooking zone. If you use more than
one cooking zone at high power on the same generator, the
generator will need to share its power to both cooking zones,
thus lowering the power level of one of the cooking zones.
When you are sharing power (cooking in both zones), the
last zone set will cook at the power setting you selected. The
other zone will experience a slight decrease from its power
setting if both zones are set high enough.
Depending on the size of your cooktop, 2 or 3 sections are
available:
• The 30" cooktop is equipped with 4 cooking zones within
2 sections.
• The 36" cooktop is equipped with five cooking zones within
3 sections. Note that on the 36" cooktop the right cooking
zone has its own section and will not share its power.
10