


14
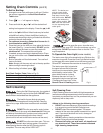
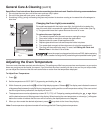
Removing & Replacing the Lift-Off Oven Door
The door is heavy. For safe, temporary storage, lay the door flat with
the inside of the door facing down.
To Remove Oven Door:
1. Open oven door completely (horizontal with floor - See Fig. 1).
2. Pull the door hinge locks on both left and right door hinges down from the
oven frame completely towards the oven door (See Fig. 2). A tool such as a
small flat-blade screwdriver may be required.
3. Firmly grasp both sides of oven door along the door sides (Do not use the
oven door handle - See Fig. 3).
4. Close the door to the broil stop position (the oven door will stop into this
position just before fully closing).
5. With the oven door in the broil stop position, lift the oven door hinge arms
over the roller pins located on each side of the oven frame (See Fig. 4).
Fig. 4
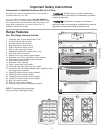
General Care & Cleaning (cont’d)
To Clean the Recessed & Contoured Areas of the Cooktop - If a spill occurs on or in
the recessed or contoured areas, blot up spill with an absorbent cloth. Rinse with a
clean, damp cloth and wipe dry.
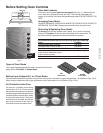
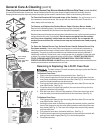
To Remove and Replace the Surface Burner Caps & Surface Burner Heads -
Remove in the following order: (1st) surface burner grate, (2nd) surface burner cap, (3rd)
surface burner head and (4th) surface burner drip pan (if equipped).
Reverse the procedure above to replace the surface burner cap, surface burner head and
surface burner drip pans (if equipped). Do not remove any parts from the cooktop
until they have completely cooled and are safe to handle. Do not operate the
surface burners without the surface burner cap and surface burner head properly
in place.
To Clean the Surface Burner Cap, Surface Burner Head & Surface Burner Drip
Pan (some models) - Use a soap-filled scouring pad or a mild abrasive cleanser to
clean the surface burner caps, surface burner heads and surface burner drip pans (if
equipped). The ports (or slots) around the burner head must be routinely cleaned. If
residue still remains in these ports, use a small-gauge wire or needle to clean the slots
or holes. For proper flow of gas and ignition of the burner—DO NOT ALLOW SPILLS,
FOOD, CLEANING AGENTS OR ANY OTHER MATERIAL TO ENTER THE GAS
ORIFICE HOLDER OPENING. ALWAYS keep the surface burner cap and surface burner
head in place whenever a surface burner is in use.
Cleaning the Contoured Well Areas, Burner Cap, Burner Head and Burner Drip Pans (some models)
The contoured well areas, burner cap, burner head and burner drip pans (some models) should be routinely cleaned.
Keeping the burner ports clean will prevent improper ignition and an uneven flame. Refer to the following instructions:
To Replace Oven Door:
1. Firmly grasp both sides of oven door along the door sides (Do not use the
oven door handle - See Fig. 3).
2. Holding the oven door at the same angle as the removal position, seat the
hook of the hinge arm over the roller pins located on each side of the oven
door frame (See Fig. 4). The hook of the hinge arms must be fully seated
onto the roller pins.
3. Fully open the oven door (horizontal with floor - See Fig. 1).
4. Push the door hinge locks up towards and into the oven frame on both left
and right oven door hinges (See Fig. 2) to the locked position.
5. Close the oven door.
Fig. 2
Fig. 3
Door Hinge
locations
with oven door
fully open
Fig. 1