


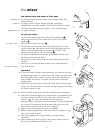
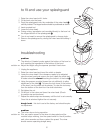


1 Raise the mixer head until it locks.
2 Fit the bowl onto the base.
3 Push the splashguard onto the underside of the mixer head ᕡ
untilfully located. The hinged section should be positioned as shown.
4 Insert required tool.
5 Lower the mixer head.
●
During mixing, ingredients can be added directly to the bowl via
the hinged section of the splashguard ᕢ.
●
You do not need to remove the splashguard to change tools.
6 Remove the splashguard by raising the mixer head and sliding it
down.
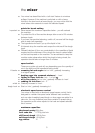
troubleshooting
problem
●
The whisk or K beater knocks against the bottom of the bowl or
isn’t reaching the ingredients in the bottom of the bowl.
solution
●
Adjust the height using the spanner provided. Here’s how:
1 Unplug the appliance.
2 Raise the mixer head and insert the whisk or beater.
3 Lower the mixer head. If the clearance needs to be adjusted,
raise the mixer head and remove the tool. Ideally the whisk and
K beater should be almost touching the bottom of the bowl ᕣ.
4 Using the spanner provided loosen the nut sufficiently to allow
adjustment of the shaft ᕤ. To lower the tool closer to the bottom
of the bowl, turn the shaft anti-clockwise. To raise the tool away
from the bottom of the bowl turn the shaft clockwise.
5 Re-tighten the nut.
6 Fit the tool to the mixer and lower the mixer head. (Check
its position see points above).
7 Repeat the above steps as necessary until the tool is set correctly.
Once this is acheived tighten the nut securely.
dough hook - this tool is set at the factory and should require
no adjustment.
problem
●
The mixer stops during operation.
solution
●
If for any reason power to the mixer is interrrupted and the
machine stops working, turn the speed switch to the off position,
wait a few seconds and then re-select the speed. The mixer
should resume operating straight away.
to fit and use your splashguard
ᕡ
ᕤ
ᕢ
6
ᕣ