


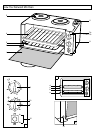

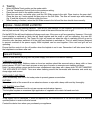

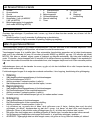
1. Door 7. a Indicator Light 11. Timer
2. Crumb Tray b Power on Light 12 Mode Switch
3. Shelf 8. Control Panel A. Grill
4. Baking Tray with Rack 9 Temperature Control B. Bake/Toast Position
5. Hotplates (one on MO625/ 10. Manual Position 13. Grill Slide
two on MO750)
6. Hotplate Controls (Model
MO625 & MO750 only)
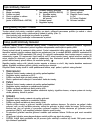
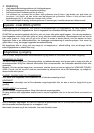
The oven shelf has two levels within the oven and in each of these locations the shelf can be inverted to give in
total 4 shelf levels (fig. 2):
- Use the upper level (position c and d) for grilling and toasting.
- The lower level (position a and b) should be used for defrosting, baking and roasting.
The Temperature Control is used to set the oven temperature. Rotate it clockwise to the required temperature,
and do not forget to return it to the MIN position when cooking is complete.
The Timer Control is used to set the cooking time. To use the auto-timer function turn the timer knob clockwise
to the required time (60 minutes max for models MO620 and MO625, and 120 minutes max for model MO750).
When the time has elapsed, the oven will chime and automatically switch off. To set times below 15 minutes,
turn the knob past 20 minutes to engage the time switch, and then back to the time required. If you do not wish
to use the auto-timer turn the knob anti-clockwise to the manual position .
The Indicator Light is illuminated when the oven is switched on and will go off when the temperature set is
reached. It will continue to cycle on and off during cooking.
The Cooking Mode switch is used to select the cooking mode required eg. bake, toast or grill.
1. Defrosting
• Select the Bake/Toast position on the mode switch.
• Turn the Temperature Control Knob to 50°C.
• Place the oven shelf in the lower rack position (a or b).
• Place the baking tray with the food to be defrosted in the oven.
2. Baking/Roasting
• Select the Bake/Toast position on the mode switch.
• Turn the Temperature Control Knob to the desired temperature.
• Place the oven shelf in the lower position (a or b).
• Preheat the oven until the Indicator Light goes off before placing the food in the oven.
3. Grilling
• Select the Grill position on the mode switch.
• Turn the Temperature Control Knob to the maximum setting.
• Place the oven shelf in the upper position (c or d).
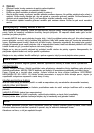
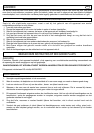
• Open the oven door, and while open, push the Grill Slide across to the right. Use the grill rack in the baking
tray for the food to be grilled, and place inside the oven. Close the door so that it rests against the stop on
the Grill Slide. The door will now remain ajar while grilling (fig. 3) and this allows air circulation within the
oven.
• When grilling is finished, return the Grill Slide across to the left and the door should close normally.
• When grilling fatty meats we suggest that the oven shelf should be located in position c.
• CAUTION - Accessible parts may become hot when the grill is in use. Children should be kept away.
Using Your Kenwood Mini Oven
Oven Shelf Position
Know Your Kenwood Mini Oven