


6
7
SeCtIon 2 Helpful Hints
Plug Brewer into its own grounded outlet — If the electric circuit is
overloaded with other appliances, your Brewer may not function properly.
The Brewer should be operated on its own circuit, separate from other
appliances.
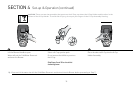
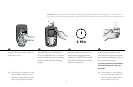
Initial Cleansing Brew — Before you use your Brewer for the first time,
perform an initial cleansing brew by running clean water through the brew
cycle without using a K-Cup
®
portion pack.
One Cup at a Time — Your new Brewer makes one fresh beverage at a time.
You’ll need to add fresh water each time you brew. Unlike other Keurig
Brewers, the B31 does not store water in the reservoir.
The Right Water Makes a Difference — For the best tasting gourmet coffee,
tea or hot cocoa, Keurig recommends using bottled or filtered water. We
do not recommend using distilled or reverse osmosis water. Water quality
varies from place to place. If you notice an undesirable taste in your cup of
coffee such as chlorine or other mineral taste, we recommend you consider
using bottled water or water from a filtration system.
Customize your Size, Flavor & Brew — With the choice of over 200 varieties
of K-Cups and multiple fill levels, your Brewer gives you endless options to
customize the size, flavor and strength that’s perfect for you. For a strong,
intense cup, select an Extra Bold K-Cup (with up to 30% more ground coffee
than regular varieties) and brew size that’s right for you. The less water you
use, the more intense flavor in your cup. The more water you use, the less
intense flavor in your cup.
To guide you, the Brewer includes a Water Level Guide located inside
the Cold Water Reservoir. The Water Level Guide is removable to make
cleaning easy.
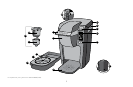
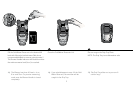
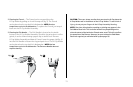
Brewing into a tall mug — To brew into a tall mug, simply remove the Drip Tray
Assembly and place the tallmug on the Drip Tray Base.
The Drip Tray — Any liquid overflow (from your cup or the Cold Water
Reservoir) will be caught in the Drip Tray. Be sure to empty the Drip Tray
when the red Drip Tray Overflow Indicator pops up. The Drip Tray has a snug
fit to ensure it stays put in transit.
Automatic Shut Off — Your Brewer will shut off automatically when it is idle for
longer than 90 seconds. Simply press the Power Button to restart.
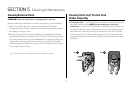
Clean Your Brewer Regularly — To keep your Brewer looking and performing
its best, be sure to clean the external and internal components on a regular
basis. See page 12 for more information.
De-Scaling — Mineral content in water varies from place to place. Depending
on the mineral content of the water in your area, calcium deposits or scale
may build up in your Brewer. Scale is non-toxic, but left unattended, it can
hinder Brewer performance. De-scaling your Brewer helps maintain the
heating element and other internal parts of the Brewer that come in contact
with water. See page 15 for more information.
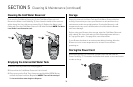
Storing — When storing your Brewer, carefully empty the Drip Tray and make
sure both the Cold Water Reservoir and Internal Hot Water Tank are empty.
Store your Brewer upright in a safe, dry, frost-free environment. See page 14
for more information.